Showing posts with label recycled craft. Show all posts

Friday, September 13, 2013

A tale of two baby quilts

 Recently a dear friend (hey there, Julie!) asked me sweetly if I would be interested to make a couple of remembrance baby quilts for her. Her twin boys had achieved the ripe old age of 3 and she couldn't bear to part with so many of their precious little things from infancy. Knowing exactly how she felt (heh, I have a stash of baby clothes that get me all teary whenever I come across them, too), I happily agreed. She had kept batches of their little shirts and onesies and such and collected a couple of big (ulp!) bags for me. Here's just one of the bags...


Upon sorting through the clothes I realized several important things: A. they were all in very good shape (no horrible stains or damage) B. the colors and patterns were in a range that would harmonize pretty well and C. almost everything was a knit (i.e. t shirt material). A and B had me stoked. C....eh, not so much. See, the trouble with t shirt knit fabric is that its so stretchy in every dimension. Which, of course, is why t shirts are so darn comfy and everyone has a zillion of them. But for sewing, yikes!  A nightmare! Cutting and sewing small shapes accurately and making anything that even looks halfway accurate was going to be categorically impossible no matter what I did.

Hmm. What to do, what to do?  I wasn't stumped--it was a fabric after all-- and I am the master, er, mistress of fabrics, am I not? Why, yes. Yes, I am. thank you very much. :)

SO... I explored my options and did some heavy cogitation for a couple of weeks. Finally, I decided that I would apply my favorite fusible interfacing, Pellon's ShirTailor,  to the little mini swatches of knit fabrics and then start cutting my squares from that reinforced and, more importantly, no longer stretchy material. Luckily the interfacing I use is not horribly stiff and scratchy; the resulting bonded fabric + interfacing will be a little less floppy but still be soft enough for cuddling.  4 inch side is my preferred square size--I've made several quilts based on that dimension and I find it just right. Allowing for a 1/4 inch seam allowance I thus cut 4 1/2 inch squares.

 So first I had to cut all of the little shirts and onesies apart, trimming out the snaps and other unusable bits. That took a peaceful afternoon just me and my fabric shears. You can see the pile above stacked up and waiting for the next step.

Luckily I had several yards of my interfacing on hand and could get right to applying it. Trim to match shape first, then iron. Accumulate another pile of interfaced swatches. Here's one ready for the stack. Guess what else I learned? I'm going to need a lot of interfacing. And when I say "a lot", I mean yards and yards. sigh. Which is fine. JoAnn's always has coupons and a single cut of a yard good counts just like any other item.


And here's the first square! Now, I just need to cut  a few more....

stay tuned!

Saturday, August 17, 2013

Lunar map covered notebooks

Hello my dears, its been a goodly while, hasn't it? So sorry about that--life has a habit of getting complicated and busy and then the dog has to go to the vet and, well, you know. But here's another little post to tide you over. I'll have another in a day or so, too, to make up for my absence!

Recently was pawing through my map stash and came across an unusual one: a lunar map. Our lovely moon was portrayed front and back by the good folks at National Geographic.

Well, I've had a lot of success with my celestial map covered notebooks of various sizes. They routinely sell out and I have to track down more maps on ebay quite often.  Of course, this significantly drives up my costs but the resulting notebooks are just so striking, I just have to keep making them.

Luckily, this lunar map was actually larger in size than the Map of the Heavens that I'm used to using so I got more notebooks out of it tha I'm used to getting. I was able to cut 4 full size and 7 mini covers from that one map as you can see here.
Here are 2 of the full sized finished notebooks. These two are college ruled.


And here are the 7 mini-notebooks. There were quite a few smaller moon images on the map depicting the different phases and such so I lucked out having scaled moons for the minis. Yay!

I'll be very interested to see if these are as popular as the celestial map versions!


Thursday, March 07, 2013

T-shirt yarn challenge

Ya know, not every craft idea works out.

I haven't knitted anything with my t-shirt yarn in a while and I thought I might try to work out something that was new for my etsy store utilizing this grand recycled medium. I've made bath/floor mats and trivets of various sorts and sizes with t-shirt yarn and I wanted a new knitted project.

Cup cozies sounded like a brilliant idea! Everyone is walking around with a paper cup from Starbucks or their own refillable tall cup these days and they all need a cozy, right? Right? Of course!

Time to get cracking: in an effort to eliminate seams, I first tried knitting in the round with (enormous) double pointed needles. These babies are like broomsticks, I tell you. But they are beautifully made and a pleasure to touch and use so I forged ahead.

Anyway, I thought that tube looked kinda clunky so I ripped it all out again. Stockinette stitch just looked wrong.

 So then I tried garter stitch knit from one end to the other and thus wrapped around the cup sideways. Which, of course, was going to force me to graft up a seam. Oh well.
And here is the finished product.


o_O


Gotta say: I'm not a fan. Its clunky. Its big. Its so big, in fact, that its hard to wrap one hand around it.

Uh....no.


Back to the drawing board....

Friday, December 07, 2012

2012 Holiday Cards

If you liked my page on Facebook, then you have already seen some of these images. But not all of them! And you certainly didn't get the full story about my creative process (and if you haven't liked my page, what are you waiting for? See what goes on in a day to day format! Click here). So read on, and see the story of the creation of my 2012 holiday cards unfold before your very eyes. :)

Well. These days I'm all about recycling and paper based collages. As I got to thinking about the theme for this year, I decided to challenge myself and craft my cards out of my recycle bin (as much as possible, anyway). Since I need to make about 70 cards, I elected to use envelopes and white card stock I already had. All of the collage materials will be recycled--woo hoo!

I really liked the horizontal strips on the palm tree cards I made recently; I think they easily translate to visual landscape. So I decided to do the same for these cards, but with a fun twist: I'm tearing the edges for a more organic feel. 70 cards is a lot and I also thought I could improve the process by making a continuous roll of background landscape and just cut it up as needed. Piecing all of those individual shapes on each card was tedious for 20 or 40 cards. 70 cards would likely turn me into a gibbering idiot. Luckily, I had a roll of tissue paper (don't ask me how or why I had it) so I was in luck; just had to trim it in half and I was all set to go.

I started with a strip of blue ocean from some of my saved bits of National Geographic maps. Next I wanted a feel of distant hills, so I chose newspaper, which visually reads as gray. Close to the foreground I needed something off white so I went with some country interior from the same Nat. Geo. maps (did I ever mention that I save EVERYthing? no? well, I do). I'm almost at the foreground, so I switched to some manuscripts from my office recycle bin. The paper is white but there's printing on it.
[I bet you're admiring my kick-ass tablecloth, eh? One of my favorites!]
 Finally, I used unprinted margins or the back side for a strip of pure white at the bottom. Along the way, every bit of the underlying tissue paper was covered.
 Next step is to cut the strips and affix to the card. Here's a rough cut.
 And here it is trimmed with doily snow flakes added. Ok ok, strictly speaking, the doilies aren't recycled, but I needed a little something to add interest in the foreground and emphasize the whole winter theme.

While the snowflakes do do both of the above, unfortunately, I find them pretty boring. Need something else....
 One of my favorite pages on FB, A Room with a View, recently posted a lovely photo of a red birdhouse. I remembered that I had a few leftover red card stock cards from about 10 years ago ( I save..., well, you know) so I dug those out and cut this cute birdhouse. The post and perch are from saved grocery bags, so more recycled points there.

Hmmm. I like the house, I like the contrast of the colors and the sharp vs. torn edges but I don't think the horizontal format works. And I still need some close-up details.
 So let's flip this baby vertical! Yes!

A few doily snowflakes come back, too. Yes! Yes!

A vintage 50's look stamp adds the final touch! (stamped in black) Yes! Yes! Yes!

[Check out the photo that inspired me at A Room with a View on FB]
Let's just tweak the layout a little bit--the stamp on top of the birdhouse was too rigid.

And here's the winner!

[Don't worry, the house is still bright red, I just took this photo later in the day with all artificial light.]

Did I meet my challenge? I cheated a little with the doily bits, but otherwise I did, indeed, use all recycled or leftover materials!  I'll sign these cards and stamp my LizzieLuvs2Recycle logo on the back and I'll be done! Yay!

And now I go into high card production mode...

Wednesday, October 24, 2012

And yet more cigar boxes

I love me a good cigar box, you all know that. If it does something cool in addition to being a cigar box, well, that's a big bonus!

Recently, I succumbed to the washi tape craze. I have held myself in check because I can plainly see that these addictive lovely little tape rolls could easily take over. So...washi tape, cigar boxes and a little cruising on the interwebs for inspiration and a new project is born!


Here is the cast of characters: 4 new (used) cigar boxes fresh from my local cigar shop. This time I chose "naked" boxes with no decorative paper covering.


My good friend Chris from Fox Trail Knives was kind enough to cut these little "G" shapes out of some leftover wood I had from another project. We had a nice time brainstorming what their exact size and shape should be for what I wanted them to do. And since he has practically every woodworking tool known to mankind (well not really, but way more than what I have) it was no problem for him to cut these shapes pretty quickly.


Next, he cut and sanded down my dowel rods so that they fit inside each box. The interesting thing about cigar boxes is that they all are unique in size and dimensions. Even those that are for the same type of cigar have some fluctuations. I love that--machine made/computerized precision is death to the organic beauty and individuality of crafts, especially wooden ones.


I had also purchased some hacksaw blades and now I trimmed these to fit within each box.
The serrated blade will act as the cutting edge for some of the washi tape.
A little manipulation quickly demonstrated that if I just glued the blade down to the inside lip of the box (outside mounting would look too crude, I felt) the blade would interfere with the lid closing properly. So I needed a way to tilt the blade inward just a bit. I decided to glue down a piece of string as guard to fulfill that purpose. I used my favorite wood glue which dries yellow. sigh. yeah, next time I'll use the Elmer's so the yellow doesn't show on the white string. But the blade will cover most of it anyway.
After the string's glue was dry, I mounted my blade with E6000, some of my favorite adhesive. Its smelly, but it sure gets the job done. Then I used the wood glue to adhere the G-brackets and...
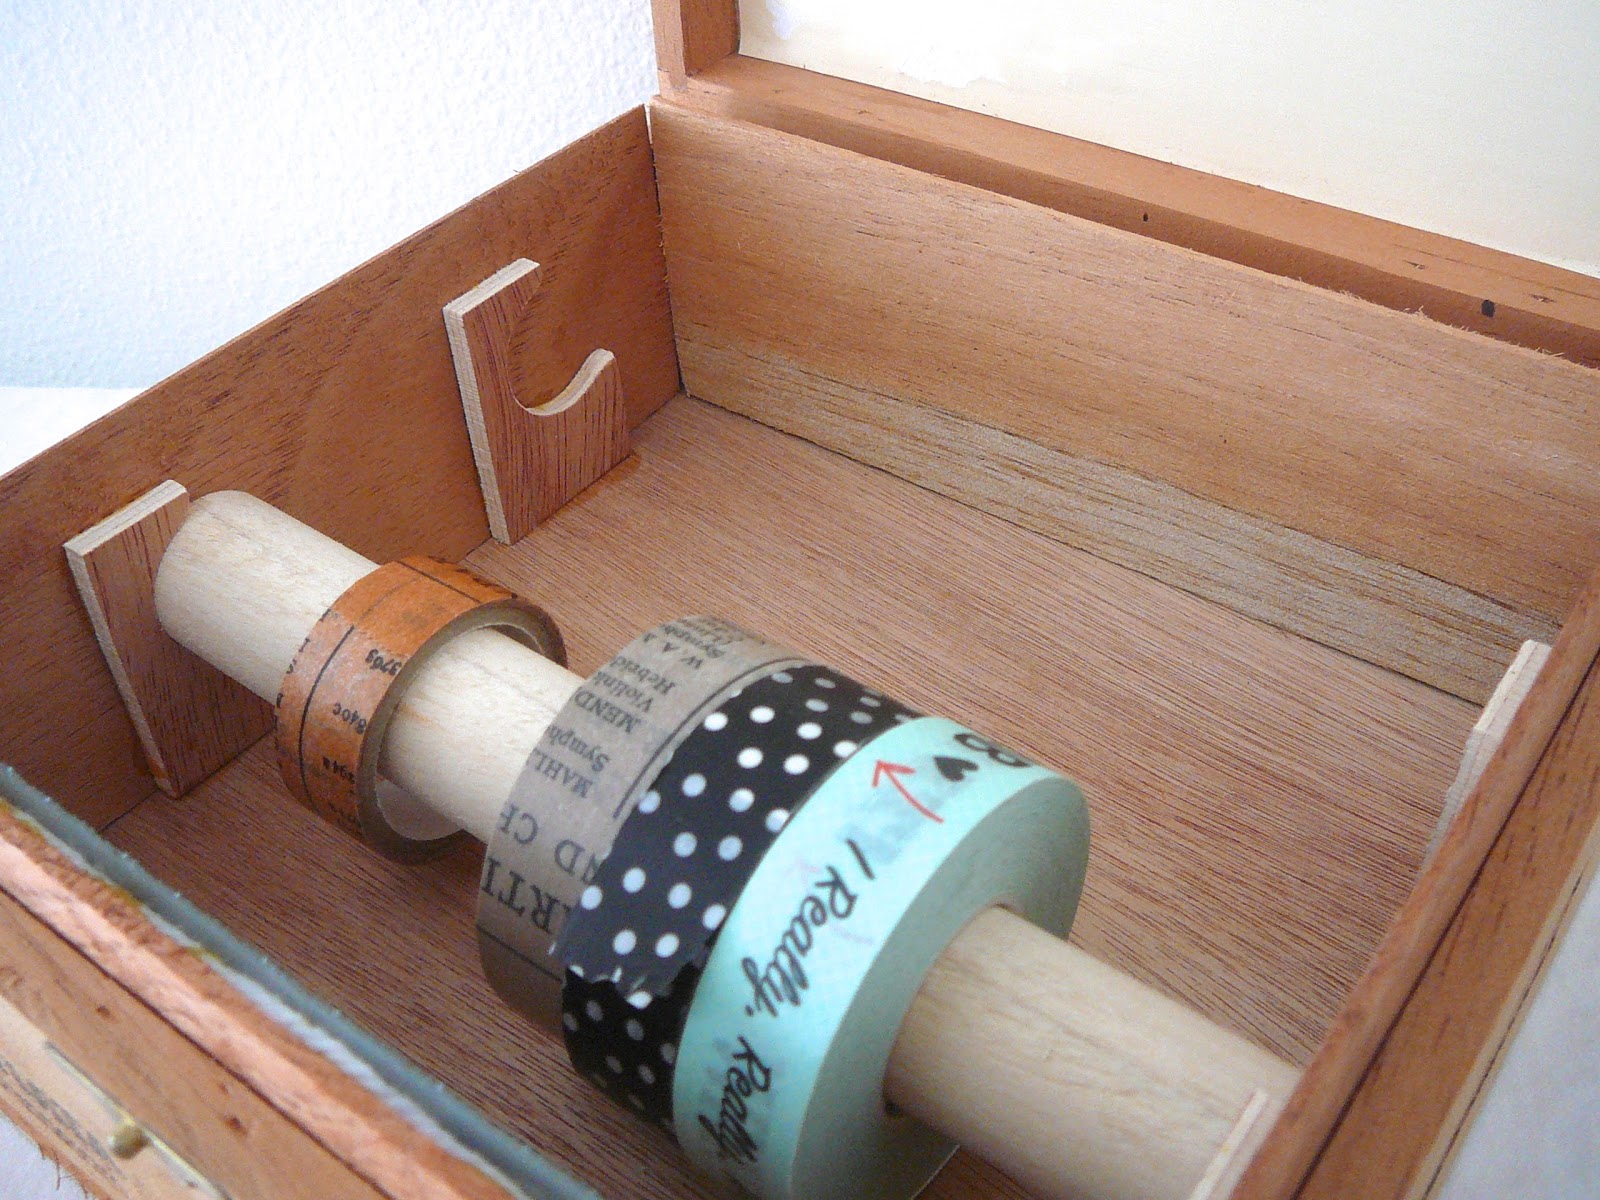
 Voila! Washi tape storage!
 The dowel rods easily lift out so that I can switch my tapes out, but because the bracket has a raised lip at the back end, the dowel rods easily stay in position.
I've removed the back rod here and you can see the where the rod rests on the bracket.


Thanks again, Chris! I would have had to undergo major contortions to accomplish these wooden cut-outs or something that approximates them.

Monday, October 22, 2012

A happy customer :)

My lovely niece recently place a large order from my Etsy shop for some early Christmas shopping. I was quite grateful for the business, of course, and envious that she was getting started Christmas shopping so early. I'm sure I'll be running around in December, as usual. [sigh]

One of the items she purchased was for herself, however, and she sent me a very nice picture of her wearing her new Frida Kahlo pendent.

She paired it with the perfect black cord, I think!

Thanks for sharing, Jackie! I don't usually get to see my creations out in the big wide world when they find new homes, so this is a nice treat for me.

Wednesday, October 03, 2012

Fabulous sunsets and recycled maps

Lately, my favorite medium is paper. Specifically, old maps from atlas or foldable road maps or those large map inserts in National Geographics. I find that the map patterns are instantly recognizable as a map (iconic, really) and thus to use them as the material for a different product entirely results in a pleasant mental juxtaposition that keeps flipping back and forth in your head. "Huh?" you say? Just wait...I'll get there.

Recently, I had offered to making some thank you cards as wedding present for some dear friends of mine who will be married on the beach this coming Saturday in Key West. They wanted something: beachy/tropical/maybe palm trees, please? on the cards so recently I got to work.

At the top you can see the envelopes that I made. Each was individually cut out using a template I made, folded, then glued down. The final step is painting on the gum on the flap so that its sealable. Et, Voila! A real, live envelope!

Next, it was time to make the cards. The background was going to be a tropical sunset. Blue ocean pieces were pasted down first.

Next, a series of sunset colored strips and streaks were pasted down in random but leasing more or less horizontal layers. Golds, yellows, oranges, pinks and purples from various different map sources were utilized. An extra strip or two of blue was also added, usually ending in a blue at the bottom. I planned to put a setting sun at the bottom but that just didn't look right, so I left it out. Man, I just love doing collages.

So far, so good. I thought the sunset clouds looked pretty good, and it was a lot of fun to assemble them one after the other.

Now for the piece de resistance! I had cogitated long and hard about how to get that darn palm tree in the image. Here was my process: palms can look either really cool or very stylized and hokey. Obviously, I wanted really cool. To me, really cool = biologically accurate. Hmmm. Biologically accurate palm trees have a lot of leaves. Each leaf has a lot of leaflets. OK--cut them out of black paper? Gack! Heck no. Take, mmmmm....maybe, 10 years? Nah. Draw them free hand? Too much variation possible and take, maybe, 7 years. I had good luck dealing with Simon's Stamps in the past so... I developed a biologically accurate image of palm trees in Photoshop until I had what I wanted, then I sent the image to Simon's and had a custom made rubber stamp manufactured to my size parameters. Here's what I ended up with--a unique palm stamp that I just love. Tell me that that is not a big-ass rubber stamp!


So then I got to the fun part of the project: stamping! Just simple black ink for the palm trees, thank you very much. Because that's exactly what color they are in front of a sunset, don't you know. And the palm tree shape is instantly recognizable too. (yeah, I know, I said that about the maps too, didn't I?)


And my last picture is a close-up of one of the cards. Obviously they are all unique as far as the background is concerned. Each stamp turned out a little different too. I also had to do a little touching up with a black marker as the ink image did not lay down at the paper piece edges. But that was fun and quick job, too. Overall, there's a nice continuity. Very satisfying to see all of them together.

Ok. Juxtaposition time. :)
Look at the bottom picture. Blur your eyes a little. Focus on the background only--its made of maps and countries and oceans and roads, right? Now, focus on the foreground/palm trees. My, those are nice palm trees aren't they?  Background becomes gloriously garish clouds that you would see any day of the week at sunset here in lovely Florida. Not maps any more at all. But wait, they are maps! See? look closely! and..


Boo yah! Mental juxtaposition!

:D


Wednesday, September 05, 2012

Celestial Journals

You may well ask where I get my supplies, and I would say: that's a good question! A lot of my stuff I have had for years (in some cases since I was a kid, even) and other things I just come across and snap up for a rainy day. But sometimes I need a particular item right now, so I have to go out and get it. I have been known to hit up Home Depot, Michael's and JoAnn's, among others. If they all fail me, or its a more esoteric item, I must search on-line. In those cases I check out etsy vendors, ebay and sometimes even Amazon. So far, I have almost always successful.

So, recently I purchased a collection of National Geographic maps for my various paper projects and when it arrived I was pleasantly surprised to see that one of the maps was not a world map but a map of the heavens. The journals that I covered earlier in the week turned out so nicely, I wanted to create celestial composition note books too.


Above, you can see the full size notebooks; one with the southern hemisphere sky and one with the northern hemisphere heavens.

Below are a couple of mini notebooks featuring particular constellations.

I think I will never have to buy another "special" notebook for journaling again!

Monday, September 03, 2012

Map covered composition notebooks

Hello my dear friends. I have been busy working and crafting and have a couple of new things to share with you. I have made a little progress in the sewing department but crafting once again has been taking center stage. I've also had a big push to get all of my finished items up and available on my etsy store. I find that the crafting is fun. The picture taking, editing and computer work, eh.. not so much.

 My latest craft is pretty simple but with a super WOW factor--at least I think so. Hopefully, you will too.

Another map project--this time covering composition notebooks. I love the size and heft of them so it seemed like a natural extension of my love for map crafts.

Here are four full sized composition notebooks, all covered with vintage maps from National Geographic magazine which I purchased from ebay. (you can buy anything on ebay, I swear).


 Don't you just want to sit down and start writing? I'm very tempted to keep some of these for myself, I can tell you.
 And even more adorable are these mini composition notebooks. So cute! Love the way these turned out.
My daughter had to snag one of these as soon as she saw them. Perfect for you purse or pocket, wouldn't you say?

Sunday, August 12, 2012

Another felted sweater fabric craft

Well, you know I've been working with felted sweaters, right? I really like the stuff--it has so many possibilities. I've made bunches of flowers (check my etsy store, btw, I just added some in the jewelry section.) And I have plenty of flower bits still waiting to be used, either as flowers or something else.

But I have all of these sweaters to use (thanks, Carolla, for hitting up those Chicago thrift stores for me!) and so I put my thinking cap on and cogitated about current pop culture. Just about everybody in my circle has an e-reader these days, whether its a nook or kindle or kobe. And everyone who has an e-reader has a case for that e-reader.  Its a necessity, really, to protect your investment. Most of my friends, when informally polled, were not excited with their case (too plain, but too expensive to ditch.) So, I decided to construct an e-reader case.

yeah, you saw that coming, huh? :)

Anyway... I reasoned that I would make more than one of these so I decided to make a template. I've decided on a simple envelope shape.


Here is my cut felted sweater piece. I've carefully centered the cable pattern, of course.


I've folded my envelope shape and it looks pretty good. I did some experimenting with sewing techniques on some sweater scraps and quickly realized that my sewing machine was not going to work.
So, hand sewing was the preferred method of construction along with a little fold at the lower corner to contribute to the depth (sorry, you can't really see it).
Love how the pattern shows on the back.
I had a toggle that I had removed and saved (of course!) from one of my felted sweaters before washing it and I used that as my closure mechanism. I had to hand sew that sucker on too, which took a little while, but I'm pleased how this one turned out.


I'd put my Kindle in that!

Thursday, August 02, 2012

Pig tail thing-a-ma-bobs

 Hi all!

As promised: a bunch of new pics--this time of ornamented pig tail elastics for the little girls among us.


Some pink wool felted flowers.


And some blue wool felted flowers.


 Here are a couple of covered buttons that I put together employing the hand embroidered portions of a vintage tablecloth. It was stained and unuseable but the embroidery was just to nice to toss so I have been saving it for years. Finally, I have use for all of that fine needlework!


And here is a close-up of these pretty little violets. Such lovely embroidery. So sweet for a little girl, I think.


Here are some covered buttons with a more modern take. This is not vintage fabric, but the whole princessy thing was just to hard to resist.

If my daughter were still 3, I would most certainly be using these on her!


Here's another pair, this time from vintage bed linens. Two little hedgehogs; a boy and a girl.

This cover was my favorite as small child. I would stare at these little hedgehog people and the other critters for hours. Or it seemed so to me, anyway. Brings back the warm and fuzzies for me! :)