Friday, December 30, 2011

Leaves done, mini collage

Well, Christmas is over, the cookies have all been baked (and mostly eaten), the cards have been sent and the wrapping paper explosion has been cleaned up.

So now its time to get back to our regularly scheduled works already in progress. And there are a bunch of them! I'll just blog about a couple of them today.

At the top of my "must get done" list is the underwater/mermaid piece. I've been sewing all of those pesky seaweed leaflets down and they are finally done, outlined and the backs trimmed out. Whew!
That actually took quite a while (last week or so) but I haven't posted cuz, honestly, how many pictures of gold leaflets on a royal blue background does a body want to see?

OK, well, here are a couple, anyway. But I'm only including them because I'm done with the little buggers.

First is the whole piece (more or less), laying (as usual) on my bed. Its a long, vertical piece so I think I will have to start taping it to a wall to give a more accurate rendition. This shot probably looks pretty much like the last picture I showed so here's a detail picture.

Hopefully you can see some of the stitching. I'm happy with them and happy to move on to the mermaid and other elements.


One of my New Year's resolutions is to to be more active creatively on several fronts: start more art, finish more art and sell more art. That includes getting organized and entering more shows. I slacked off in 2011 and I feel like I need to get back in the groove. Pulling entries together and getting them submitted is always a chore and inevitably takes 5 times longer than you think it will and this past year I just didn't have the energy. But I feel like I can handle it again so I got an entry submitted (all online) today (deadline is tomorrow). Its a collage based show, so its kinda a new sort of venue for me. I had 3 pieces already completed that I thought were appropriate and I reworked/finished a 4th one yesterday for inclusion.

Check it out! Its a little piece (see the energy drink pop top?) with bright colors and lots of itsy bitsy details.

I sure hope it (and its brethren) get in to the show, but supposedly I won't find out until the end of March or so. Keep you fingers crossed for me!


Friday, December 16, 2011

Christmas Card fail and then subsequent redemption


Well, it almost never happens, but this year's original Christmas card was a failure. :(  I liked the design and the finished card looked pretty darn good but production of 60 cards was just not to be.

See how nice they turned out?

sigh

Unfortunately, all of that lovely fine glitter clogged up the acetate stencil that I had cut and it became a constant battle of cleaning out the stencil every second or third spraying. If I didn't do it that often the glitter started filling in the narrow lines of the letters, dammit. So I did that, starting to grumble. But then when the stencil started to break/tear at some of the narrow places, I saw the handwriting on the wall.

It was just not going to happen. 20 cards? yeah, I would have toughed it out. But 60? no way.
Time to regroup. Remember: "its not a mistake, its a design opportunity". Right? Right!

Ok. Well, I already had a stack of pre-sprayed background cards so it had to involve them. I did not wish to go back to the drawing board and spend an excessive amount of time conceptualizing so I (guiltily) rehashed a designed from a few years ago with a textured paper star. An added plus: I still had some of that textured paper and was happy to use it up.

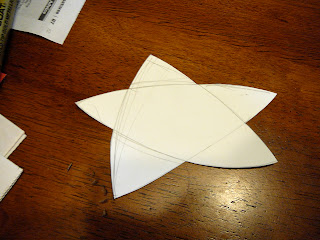
Here's my nice fat star template--I like him!


And here is my stack of textured stars. You can barely make it out, but they, too, have been sprayed with the gold glitter spray from Lowe's. Holding the spray can at a sharp angle while spraying allowed the glitter to get in the closer crevasses and not in the away crevasses, making for a nice effect. (You'll have to take my word for it; I know it doesn't really show up here).
A sheet of foam that I had saved from some shipment or other gave its life to make some little rectangles.
(extra points for recycling and keeping a piece foam out of the landfill)
And then out comes the glue gun and attaches all of that foam to the stars....
and then the stars to the cards!


And that is it. Whew--I'm done. Crisis averted. Yay!

 Time to start addressing those cards now...

Monday, December 12, 2011

Updates...

Its been a busy weekend and I made a fair amount of progress on several fun projects. So here are some interim updates on three different works I've got going. {Don't ask me why I have so many projects going, sometimes it just happens that way. Just a little crazy sometimes, I guess.} And I'm not even going to mention the 3 different kinds of Christmas cookie dough that I have chilling in the fridge. gack! Never mind--you didn't hear that--

Anyway, On my large underwater piece, I sewed down some bias tape stems for some seaweed as you can see here. I personally love Clover iron on bias tape. Its so nice and curveable.  You still have to tack it down, of course, or it will pop off after some handling. The only downside to this wonderful stuff is that its difficult to come by in colors. Usually you only find it in black (folks use it for making "stained glass" quilts). Every once in a blue moon I stumble upon it in other colors and when I do, I snap it up. So I went to my stash and found some mottled light brown tape--perfect. Also a little gold for just a short stretch.

After that was done, I spent some nice, contemplative time laying out the leaflets of the seaweed--quite a few tan ones, some yellow and a few gold ones cut into 6 different sizes. I want it to look like some of them are catching the light underwater and flashing it back at you.

Obviously, I have a lot of leaves to sew down now. I'll be doing some raw edge applique to accomplish that. Since I fused all the leaf fabric to some Pelon Shirtailor interfacing, I will have no trouble doing that with a narrow satin stitch. I got a few of them done over the weekend but by no means all. Its fiddly work and I can only concentrate for so long before I start losing my focus and start getting sloppy.

When that happens, I have found that its just no good trying to "power through" or some such. I'll just make more and more mistakes and get supremely aggravated. Maybe even have to pick out some stitches. Which I hate doing, but I'll force myself if I've made a botch of things. At least in this medium you can do that unlike other media.

So when I exhausted myself on the leaves, I took myself off to the kitchen to design this year's Christmas card. Keeping it simple this year and no textiles, either. Something with some spray paint and an acetate stencil seemed the way to go.
Here's my sketch in the actual card dimensions on the left. I'm seeing lots of glittery gold. I bought some holiday spray glitter at Lowe's last weekend and I'm thinking that it might be just the thing.

And here is the acetate sheet half cut out. I'm not a big fan of working with an Exacto knife, but I worked slow and steady and kept it together and did an ok job of making a nice stiff stencil.


And then, since I've had a several sales from my etsy site recently, I worked on replacing some of the inventory of my biggest seller: business sized envelopes. So relaxing to trace and cut these out and then so fun to fold them and watch them become an envelope. Its a simple thing but I get a big charge out of it for each and every one.


Yay!

When the weekend was over, I felt so accomplished. Even though I didn't get anything technically completed, I still was deeply satisfied.

And its just as much about the process as it is about the product, isn't it??

Saturday, December 03, 2011

Doggie sweater

Well, its finally getting a little cool here in central Florida so us humans are donning our hoodies and maybe even thinking about a sweater (in a month or so, anyway). The corgis have long since laid down their winter fur (you'd think it was the arctic or something) so they're all prepared and then some.

But.

If you're a miniature pinscher and cold weather is a'comin, you are none too happy, seeing as how you have no fur to speak of on your tummy and not much anywhere else.

May I introduce the smallest member of our household? This is Gidget, a rescue doggie (like our other two).

She's my daughter's dog and loves to cuddle and be fussed over and wear clothes (really!). And, of course, she gets cold and is always looking for that really warm spot to curl up in and have a nap. One day, I came home and went upstairs to take her out and she did not greet me at the door when I opened it like she usually does.

I soon saw the reason why--she had found Fiona's sweatshirt on the floor, pawed at it and crawled into it until she was all snuggly and warm. When she tried to get out, she left via the sleeve and this is how I found her. Oh my, I laughed until I cried. She had wormed her way halfway across the room and had only managed to wedge herself in even tighter. Poor thing was mortified so I liberated her right away (after I ran and got my camera).

So even though she has some store bought clothes, I decided a nice custom made knit sweater would be just the ticket for this little girl. That way I could compensate for her exact dimensions and really cover most of those bare parts and use up some of the odds and ends in my stash as well. So I got out my double pointed sock needles and a variety of cotton, silk and linen leftover yard and started knitting away. No pattern--I'm winging it and living dangerously. I suppose I could have searched for a pattern online, but I'm pretty confident I can whip up something appropriate. Here's the early progress: knit in the round from the neck down, some short rows in the chest and then leg holes on some stitch holders.

Here's a close-up of the yarn. I'm knitting with two strands: a beige/white cotton linen yarn (I had 3 balls of that) and something else (one of my many little oddballs that I compulsively save). Knitting with the cotton linen yarn blends all of the oddballs together despite their varying weights and colors/values so I'm pretty pleased so far.

So stay tuned--this will be done soon and I'll post the finished product up close and being modeled as well. :)

Underwater under construction

Hello all! I'm finally back in the swing of things so I have several things to post about. Yay!

After many moons, I have picked up my under water quilt once again and decided to just get a move on. I had been strop piecing the background with various shades of royal and navy blue, but had gotten bogged down (=bored) with endless blue, blue, blue strips, strips strips. I had made 6 strips and sewed them together but they were not wide enough for the dimensions I envisioned. Bleah!

As I was browsing the internet this one evening last weekend, I came across Sherri Lynn Wood's awesome tutorial on how to sew curved seams and something just clicked! I cut my long 6 strip wide panel in half, sewed it to itself to make a 12 strip wide piece and then cut it up into gentle curves.


Those got inserted between swatches of some of the same solid fabrics I used in the strips. et Voila! A lovely, shimmery underwater background in the size I wanted. Sherri is hosting a Mod Mood quilt archive for folks that have used her technique and are making a Mod Mood quilt--check it out!