Friday, September 13, 2013

A tale of two baby quilts

 Recently a dear friend (hey there, Julie!) asked me sweetly if I would be interested to make a couple of remembrance baby quilts for her. Her twin boys had achieved the ripe old age of 3 and she couldn't bear to part with so many of their precious little things from infancy. Knowing exactly how she felt (heh, I have a stash of baby clothes that get me all teary whenever I come across them, too), I happily agreed. She had kept batches of their little shirts and onesies and such and collected a couple of big (ulp!) bags for me. Here's just one of the bags...


Upon sorting through the clothes I realized several important things: A. they were all in very good shape (no horrible stains or damage) B. the colors and patterns were in a range that would harmonize pretty well and C. almost everything was a knit (i.e. t shirt material). A and B had me stoked. C....eh, not so much. See, the trouble with t shirt knit fabric is that its so stretchy in every dimension. Which, of course, is why t shirts are so darn comfy and everyone has a zillion of them. But for sewing, yikes!  A nightmare! Cutting and sewing small shapes accurately and making anything that even looks halfway accurate was going to be categorically impossible no matter what I did.

Hmm. What to do, what to do?  I wasn't stumped--it was a fabric after all-- and I am the master, er, mistress of fabrics, am I not? Why, yes. Yes, I am. thank you very much. :)

SO... I explored my options and did some heavy cogitation for a couple of weeks. Finally, I decided that I would apply my favorite fusible interfacing, Pellon's ShirTailor,  to the little mini swatches of knit fabrics and then start cutting my squares from that reinforced and, more importantly, no longer stretchy material. Luckily the interfacing I use is not horribly stiff and scratchy; the resulting bonded fabric + interfacing will be a little less floppy but still be soft enough for cuddling.  4 inch side is my preferred square size--I've made several quilts based on that dimension and I find it just right. Allowing for a 1/4 inch seam allowance I thus cut 4 1/2 inch squares.

 So first I had to cut all of the little shirts and onesies apart, trimming out the snaps and other unusable bits. That took a peaceful afternoon just me and my fabric shears. You can see the pile above stacked up and waiting for the next step.

Luckily I had several yards of my interfacing on hand and could get right to applying it. Trim to match shape first, then iron. Accumulate another pile of interfaced swatches. Here's one ready for the stack. Guess what else I learned? I'm going to need a lot of interfacing. And when I say "a lot", I mean yards and yards. sigh. Which is fine. JoAnn's always has coupons and a single cut of a yard good counts just like any other item.


And here's the first square! Now, I just need to cut  a few more....

stay tuned!

Saturday, August 17, 2013

Lunar map covered notebooks

Hello my dears, its been a goodly while, hasn't it? So sorry about that--life has a habit of getting complicated and busy and then the dog has to go to the vet and, well, you know. But here's another little post to tide you over. I'll have another in a day or so, too, to make up for my absence!

Recently was pawing through my map stash and came across an unusual one: a lunar map. Our lovely moon was portrayed front and back by the good folks at National Geographic.

Well, I've had a lot of success with my celestial map covered notebooks of various sizes. They routinely sell out and I have to track down more maps on ebay quite often.  Of course, this significantly drives up my costs but the resulting notebooks are just so striking, I just have to keep making them.

Luckily, this lunar map was actually larger in size than the Map of the Heavens that I'm used to using so I got more notebooks out of it tha I'm used to getting. I was able to cut 4 full size and 7 mini covers from that one map as you can see here.
Here are 2 of the full sized finished notebooks. These two are college ruled.


And here are the 7 mini-notebooks. There were quite a few smaller moon images on the map depicting the different phases and such so I lucked out having scaled moons for the minis. Yay!

I'll be very interested to see if these are as popular as the celestial map versions!


Thursday, May 30, 2013

Tropical Fruit Salsa


So the other day I threw together some really fine fruit salsa--I love the combination of heat and sweet. This is excellent for those fish tacos or just to dress any pan fried, steamed or poached white fish. It will knock your socks off, guaranteed. I tell ya, I ran out of fish for my tacos and just had a fruit salsa taco (corn tortillas of course) and it was dynamite.

Don't sweat it on the measurements; this recipe ain't rocket science (or baking either).

Tropical Fruit Salsa

1 medium tomato, diced
1 small mango, peeled and diced
5 slices pineapple, peeled, cored and diced
1/2 med. purple onion, chopped fine
1 fresh jalapeño, chopped fine (or less, or you can leave this out altogether if you like)
handful of cilantro, chopped medium or fine (your choice)
juice of one lime

Assemble ingredients. Other firm fleshed tropical fruits can be added or substituted for the pineapple. Stir together everything and refrigerate for an hour or two before serving. Will keep refrigerated for several days, but beware! It gets hotter as it ages. Serves 6-8. 


Sunday, May 12, 2013

Frida Magnets and Map Hearts

Helloooo, out there! Have you wondered where I've been, dear readers? I've been right here, of course, but have not posted due to extreme work pressures. I picked up an extra temporary job bringing my total up to 3. Three jobs? Yeah, sure, I can do it, I said to myself, at least for a while to make a little extra money and catch up on some bills. Man oh man, it was not fun. Do that indefinitely? Heck, no. Er, I'd even go so far as to say: Hell, no!! But enough about that--let's get cozy and talk crafting, shall we?


Also in the interim, I've done my taxes including all of my business expenses and profit. The good news was: last year I sold a lot of items from my etsy site and in shows. Yay! The bad news was: uh, I may have sold a lot, but I didn't actually make a profit. Booo. I didn't even break even. dammit.


So, obviously, it was time to examine what was going on and do some strategizing. After reviewing expenses, products and consulting with my awesome CPA, I came to some conclusions. Bottom line: I over invested in supplies and constantly produced many new types of products last year, most of which did not sell enough for me to recoup. (I had a lot of fun doing it, of course, but my goal is to make a profit eventually). I did definitely learn what my most popular sellers are: vintage map covered composition notebooks of all sizes.


OK! Lesson learned! No new products this year unless I already have the supplies under my roof! Purchase supplies only to replace out of stock popular sellers.

So here are a couple of projects that have been on the back burner for a while: some lovely fridge magnets using some glass wafers I had planned to make into pendants and a fine art postcard book of Frida Kahlo art.


 I made four different sets of four each, as you can see here. I'm glad I chose to go with magnets rather than pendants or pins. I only made for sets because: A. there were only so many appropriate postcards in the book and B. I only ordered 16 of the glass wafers way back when.


Then I got to work on some other supplies that had been sitting around, taking up space! I'd worked on an earlier version of map covered hearts and not liked the outcome at all. But here are some cutie little vintage map covered heart pins that are simple and sweet and just what I was going for!


I just adhered a pin back with some E-6000 (my favorite all-purpose glue) and signed with my etsy shop name. They just measure 1.5" x 1.5" so they're not big and bulky.

Stay tuned for more items from my too big supply inventory!


Thursday, March 07, 2013

T-shirt yarn challenge

Ya know, not every craft idea works out.

I haven't knitted anything with my t-shirt yarn in a while and I thought I might try to work out something that was new for my etsy store utilizing this grand recycled medium. I've made bath/floor mats and trivets of various sorts and sizes with t-shirt yarn and I wanted a new knitted project.

Cup cozies sounded like a brilliant idea! Everyone is walking around with a paper cup from Starbucks or their own refillable tall cup these days and they all need a cozy, right? Right? Of course!

Time to get cracking: in an effort to eliminate seams, I first tried knitting in the round with (enormous) double pointed needles. These babies are like broomsticks, I tell you. But they are beautifully made and a pleasure to touch and use so I forged ahead.

Anyway, I thought that tube looked kinda clunky so I ripped it all out again. Stockinette stitch just looked wrong.

 So then I tried garter stitch knit from one end to the other and thus wrapped around the cup sideways. Which, of course, was going to force me to graft up a seam. Oh well.
And here is the finished product.


o_O


Gotta say: I'm not a fan. Its clunky. Its big. Its so big, in fact, that its hard to wrap one hand around it.

Uh....no.


Back to the drawing board....

Tuesday, March 05, 2013

Crafting and Wine: a cautionary tale

So last weekend I was catching up on restocking my inventory by making some more of my notebooks with the celestial star map covering. I had just gotten two maps in from eBay and made 7 large notebooks and 4 minis.

It seems like I've made a zillion of these by now so I took the liberty of pouring myself a little Chardonnay. Things were going swimmingly when...

I made this one------------------------------------------------>

Do you see it? No?


Look closer. I mounted the paper upside down.  Gahhhh. Once applied there is no peeling the paper off, let me tell you.

Sigh. Anyone want a celestial notebook at a discount?

Tuesday, February 12, 2013

Covered notebook tutorial

Hello all! So sorry about the long gap--don't think I haven't thought about you all! Holidays are always crazy busy and then when you get back to work in January its crazy busy catch up time, it seems.

Anyway, how about a (not so) little tutorial to make up for my time away? This tutorial is for my very popular covered notebooks--my biggest seller this past Christmas. Wow, were they popular--all sizes from the the minis to the full size composition notebooks. Here I will be covering a hardcover journal, but you can cover any book with a covered spine of any size that you like; just no spiral bound jobbies, please.

 Here's our subject for today-- a nice hard cover lined journal. First step: remove and set aside your rings; you'll find out why later.
 Measure carefully: this baby measures 5 1/4" x 8 1/4" and is about 1" thick. Add your width x 2 to your spine thusly:
5 1/4 + 1 + 5 1/4 = 11 1/2
add 1/2 inch for each edge overlap so 11 1/2 + 1 = 12 1/12;
this is your cover width.
Take your height and add 1/2 inch for each overlap so
8 1/4 + 1 = 9 1/4; this is your cover height.
 Carefully measure out your covers from old maps, or whatever paper you like. If its too lightweight, however, you will run into trouble. This technique would not work for tissue paper, for example.  You may wish to make a template out of cardboard if you are making more than one or two.
Now trim close to the edges with zigzag scissors, otherwise known as pinking shears. This step may not appear absolutely essential but it will make folding the paper over a lot easier, especially at the corners. And you want your finished product to look neat so don't skip this!
 See, doesn't that look nice?
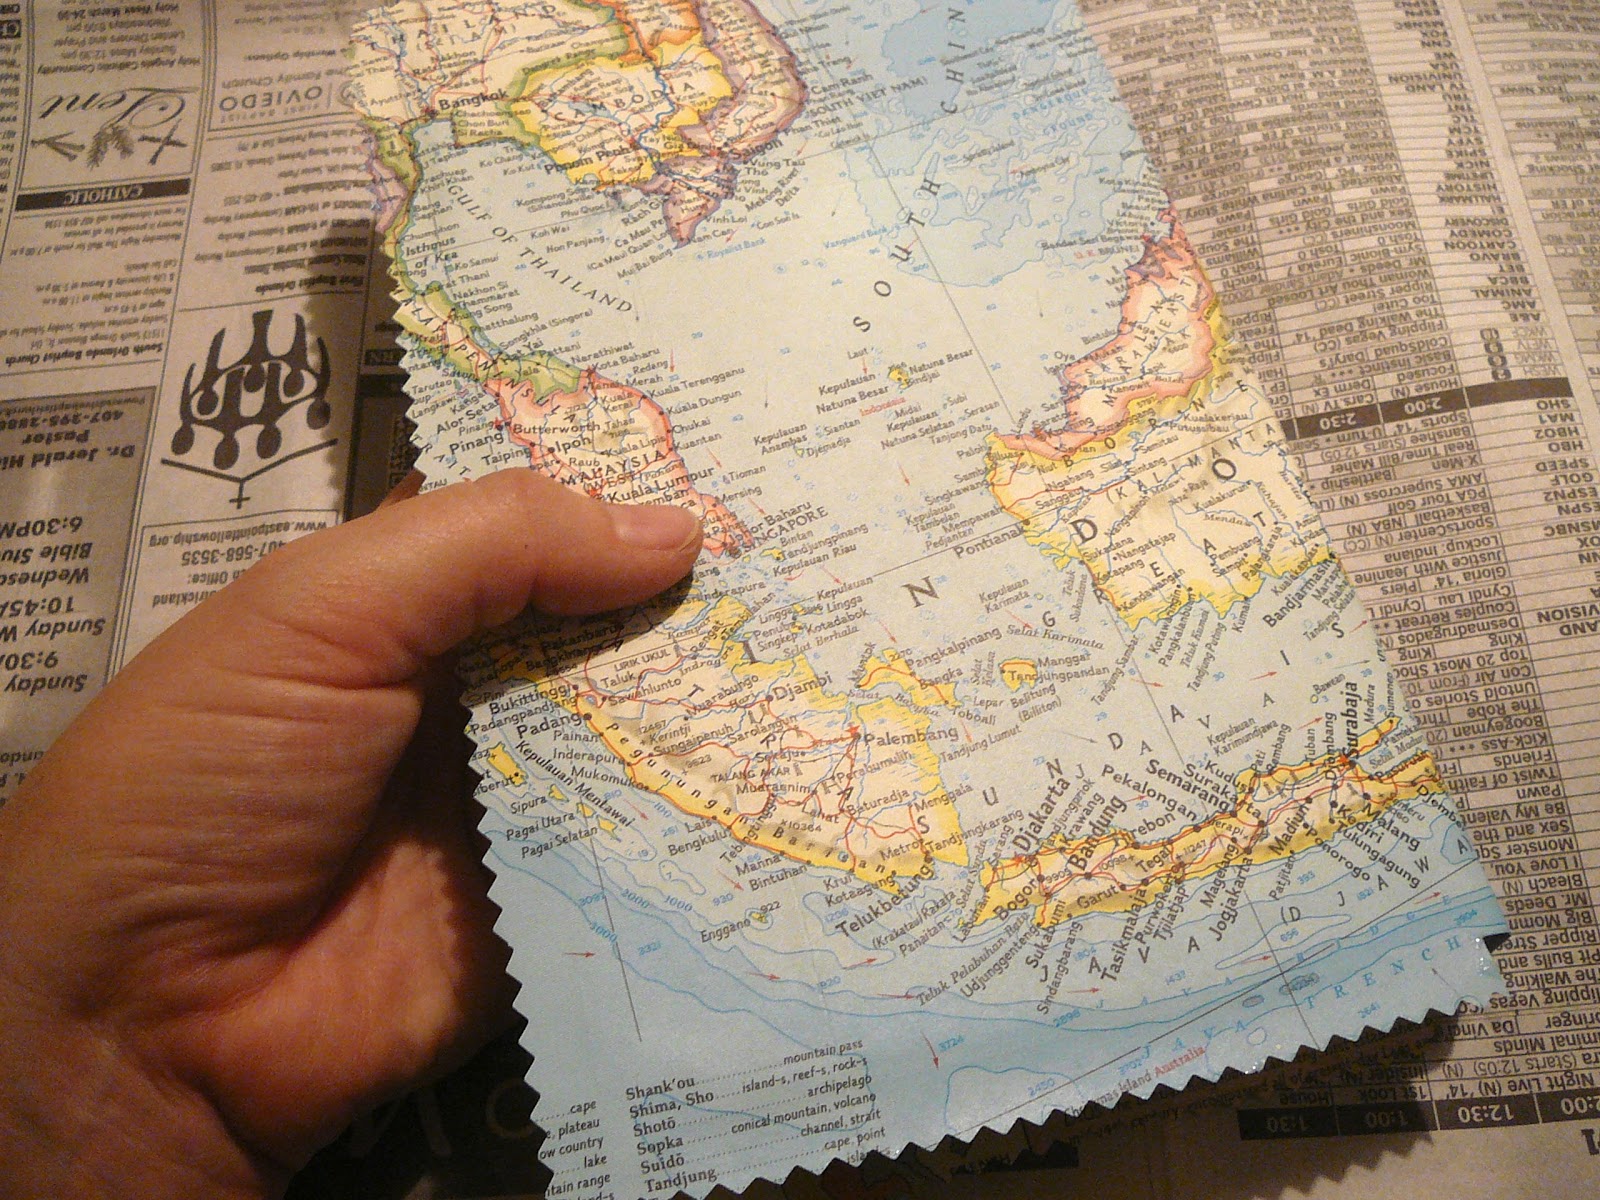
 Turn over your cover paper (I'm using a vintage National Geographic map) so that it is face downwards. Place your book right side up on the right side of the cover.
 Fold over the paper cover and center your book with more or less equal amounts of overlap for the front and back covers. If you omit this step and don't have it centered, you may not be able to adjust or shift once you lay your book down on the glued surface! (trust me. voice of experience here)
After you have shifted as necessary, draw a registration outline of exactly where your book is placed.


 Now, draw a vertical line close to your spine. This is where you will fold back the edge instead of wrapping it around. A good place to do this is at the indentation or valley right next to the spine. You'll get a feel for it pretty quickly.

 WITHOUT SLIDING THE BOOK BACK AND FORTH, stand it up on its spine...
...and continue to roll it over and place it on its front cover. If you slide it around start over by repositioning at your registration outline, or your measurements will be off.
 Repeat the marking for the other side. Remove your book and clip down those vertical little lines only (but no further!)
 Fold these little tabs back. You should have one on the top and one on the bottom.
Now its glue time! I prefer good old Elmer's and I thin it down with water to the consistency of very runny pancake batter. Certainly you can use Mod Podge for this if you have it. But save some money and use Elmer's.


Paint a solid coat of glue on the righthand side ONLY. Get all the way to the edges. Put a little under your tabs to sick them down. See how the paper is starting to curl up a little? You want that--the paper is relaxing and will thus become very pliable (albeit delicate!) but will be subject to tearing so be careful from here on out.
 Place your book down on the cover paper making sure that the flaps stay pasted down. The spine should hold these flaps down. Slide your book to the registration outline you made previously. Depending on your book's surface and size, this slight shifting or adjusting may or may not be possible so be as precise as you can be in your initial placement.
 OK--almost half way there! Pick up your book and turn over. Gently squeegee out the air pockets. Use your the edge or flat of your whole hand and just smoothly swipe. Here's where rings can press into or even tear the moist paper. Keep swiping to the closest edge until you have most of the large air bubbles chased out. They won't ease or diffuse out on their own so this is your only chance to deal with them. If you are dealing with a real hard cover as in this example I am working with here, then lift the front, unattached paper cover free to give some slack and carefully press the paper down into the valley that runs next to the spine and convince it to adhere and stay there. If you just press it down with no slack it will tear and the cover will be ruined.

Now open the back book cover and lap over the paper edges and stick them down--first the top as shown. Then the sides and then the corners. If they don't stay down, add some more glue. Not too much, though. Neatness counts here.
 Back done! Set your book down and apply glue to the remaining part of the paper cover: the spine portion and the front.
 Repeat your process, but this time adhere your spine first and then wrap around and address the valley as I have done here. Lastly swipe again across the front cover to stick it down and eliminate air bubbles.
Again, fold over margins. Corners should receive a little extra attention. They might not look exactly neat but as long as they stay stuck down you're good. Does it look neat and crisp from the outside? If not, smooth over with your fingers. Do this along all edges including the spine. Remember the paper is moist and pliable now. Later it will set up and be hard and you will be stuck forever with a sticky-outy-part. If you didn't apply enough glue to the edges to get the overlaps to stay down, add a little as needed.
Looks pretty good, eh? Not done yet, though. The whole thing needs to "cure" or dry out thoroughly. And it needs to be weighted down in the process, especially if you are covering cardboard covered books like composition notebooks. If you don't weight them, they will dry all curved up--not at all attractive. This weighting and drying process takes several days.
 Place a section of newspaper on the bottom. Place your book on the newspaper. Insert a sheet of waxed paper (not parchment, but good old fashioned waxed paper) under each cover, front and back. This prevents any excess glue from sticking the book cover to the first page (or the last page). Place another section of newspaper on top of that and put a big dictionary or other heavy book on top of that. Or another covered book, if you have made several. Just interleave with a section of newspaper each time. The newspaper sections help absorb a lot of the moisture from all of that glue. Leave this stack to set up for at least 2 days. Then, remove your weight, the wax paper and check your book. Chances are that it still needs some drying. I usually set them to the side somewhere without newspaper so that air can circulate around the entire book. I still keep a weight on them though as covers tend to keep popping up and warping for another couple of days until they are completely dry (no longer feel cool to the touch; just feel like room temperature.)


And here's the finished product! That cover is really on there, too--it will not peel off no matter what you do.

Now, really: wouldn't you rather write in the Australia journal above than that black boring thing we started out with? I thought so--me too!