Sunday, May 15, 2011

Recycled fabric finds a new fate

 So a couple of weeks ago I saw a call to artists listing for a show soliciting fabric pieces employing recycled materials. Well! That's a subject near and dear to my heart. So I gathered some old shirts and bed linen fabrics (and a few accent fabrics to even things out) and started putting them together. As you can see, I have several shard-like pieces assembled here. I plan on integrating some written word as well.


Here I have sewn all of the shards together. I ended up with 5 of the shards with the word boxes rather than the 8 I started with along with some accent triangles.

To liven up the composition I made several horizontal cuts above and below the text boxes.

 Here's the final composition all sewn up and ironed down. Quite a bit more dynamic.
And then to further the fractured theme, I added some fusible bias tape in shades of black, purple, red and orange. I always keep some on hand for odds and ends (although it is hard to find in stores in colors besides black). Clover Mini 11-Yard Quick Bias, Black I have used it in straight lines here but it makes lovely curves too. You iron it down and it stays put well enough to be sewn down permanently.

Quilting is next!


Sunday, May 08, 2011

More wall patterns

 Happy Mother's Day to all you moms out there! I got to spend a lot of fun time doing stuff I love today, thanks to my awesome kids. I started out the day working on the wall. Here is where I started this morning.....
And here I am up on that ladder dabbing on my gold paint. And, yup, you guessed it, I'm still in my pajamas.  What could be better than crafts in the morning in your pajamas? Nothing! That's what.


And here's how far I got. Just had to get a couple of repeats for the second level--cool, huh?

I also worked on my quilt top for the new small piece. I'll post tomorrow on that one. I think its almost done.

Friday, May 06, 2011

Say good-by to beige and boring!

My oh my what you can do when you take the day off! I worked straight through the day on a new quilt wall hanging for a particular show involving recycled materials, a subject near and dear to my heart. I'll post on that tomorrow. When I had that pretty much under control (pretty much finished the top), I tackled another project I've been contemplating for a while--a new wall treatment for a big beige wall. Woo-hoo!

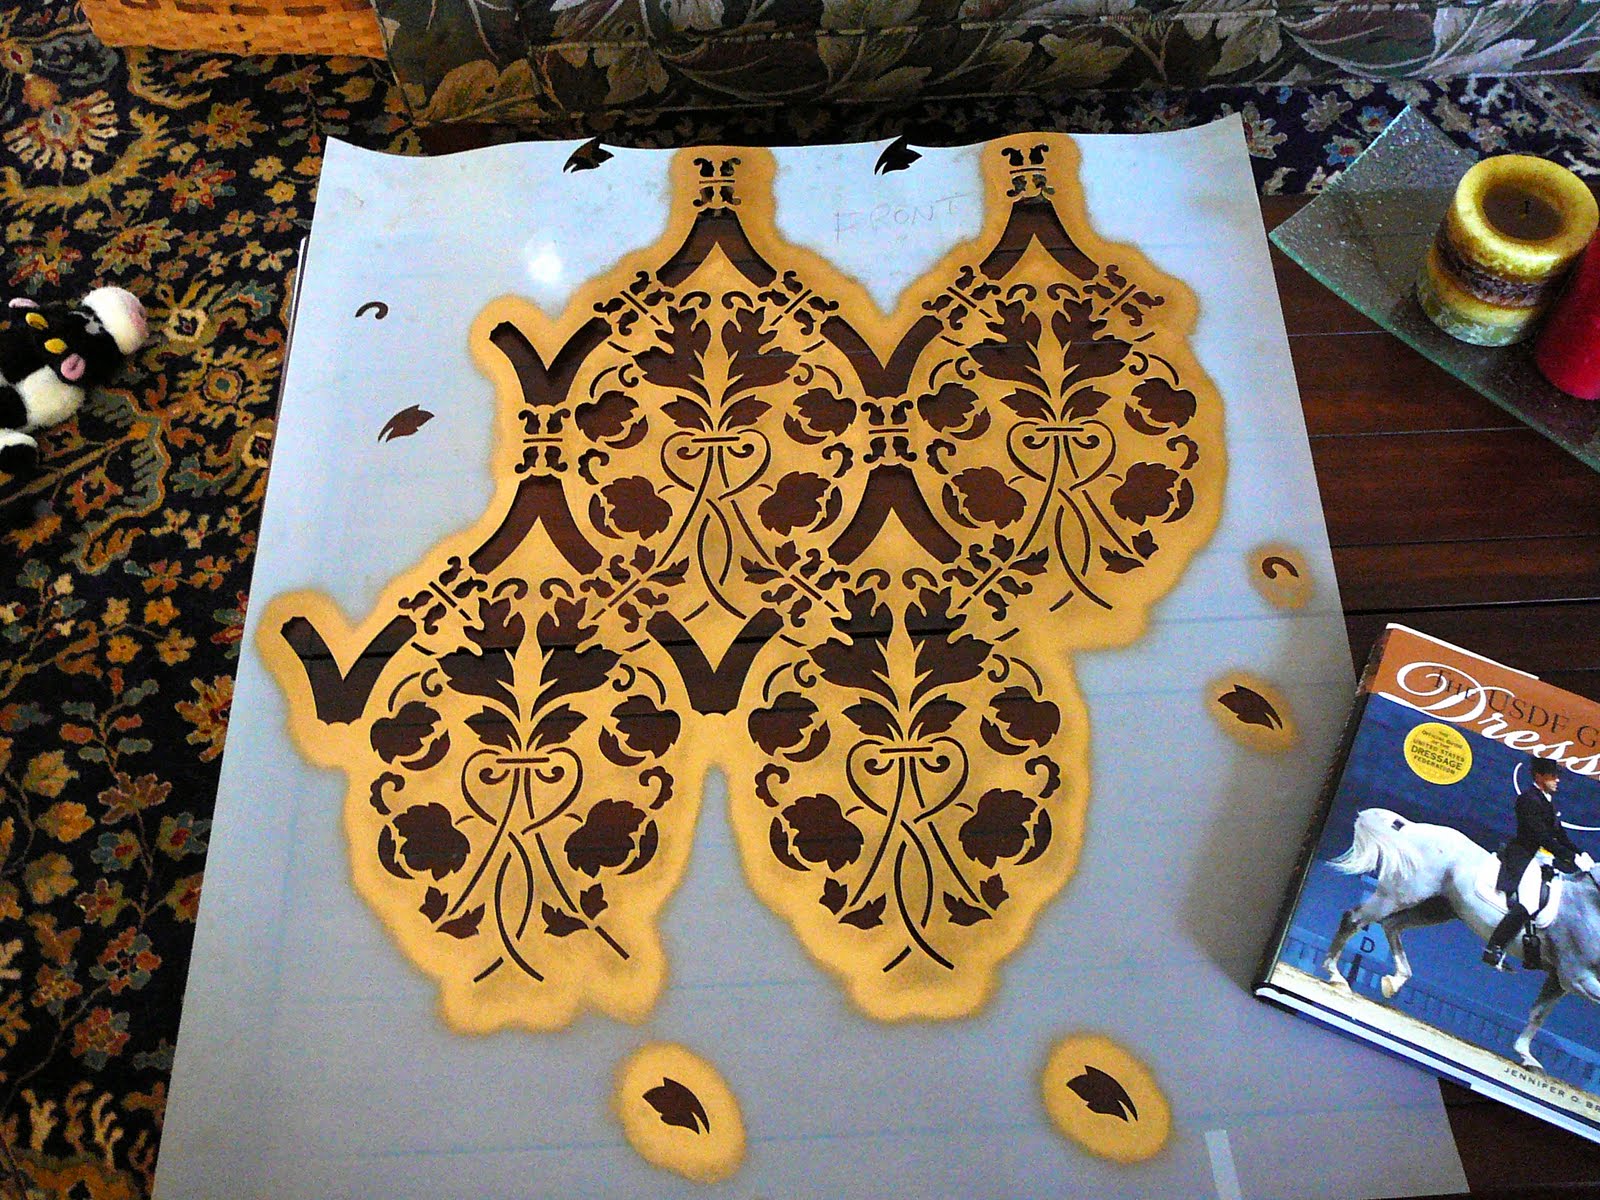
Here's the stencil I unearthed that I had used in our previous house. You can see that I used gold last time and I plan on doing so again. I love iridescent gold because it so forgiving. Any variations in amount of paint, heavy or light, blend right in to make a shimmery effect. So you don't have to worry as much about being super neat or consistent. And, of course, I have a lot of gold accent pieces in my living room which play off of the wall and vice versa.

I ordered the stencil from an online source--I'd mention it but,  sorry!, I can't remember it, its been so long. But do a google search for all-over stencils like I did. You should come up with plenty of hits like I did. Turns out there's an enormous online stencil community. Who knew??

Here's the first couple of repeats. (well, one and a half, actually.)  I have plenty more to go, obviously. But I already love it. I am using a gold Shiva Paintstik Shiva Iridescent Professional Grade Paint Sticks set of 12 for the pigment. Another necessary item is stencil adhesive Sulky Temporary Spray Adhesive 3.6 Ounces KK2000; 2 Items/Order Painter's tape is also a must-have--just the regular blue stuff will do. ScotchBlue Painter's Tape Original Multi-Surface 2090, 1-inch x 60-yard, 4-Roll
I'll keep posting so you can see my progress. Its hard work and my arm and hands get tired from the dabbing so it will be a slow and steady kind of project.


Sunday, May 01, 2011

Planning for Humpty

 So I'm finally mapping out my Humpty Dumpty piece that I originally conceptualized way back in 2009. And, yes, I frequently do take that long to mull over a particular piece. Sometimes it just takes that long to come together. And I've learned that there's no sense in trying to rush the process. Best to work on other things until the larger piece coalesces.

Anyway, I always start out with a little thumbnail sketch or two to kind of work the major layout issues out. That, along with any notes and ideas I wish to record gets entered into my sketchbook. But once I'm past that stage and its time to actually get a full scale mock up complete with templates etc., its all about tracing paper. I absolutely could not survive without gobs of the stuff. Top Flight Tracing Paper Tablet, Transparent, Erasable Surface, White, 9 x 12 Inches, 40 Sheets (65301) I get everything traced out, cut it apart and then tape it down and shift and tweak until the composition is perfect. Tracing paper is very easy to draw on and erases well without falling apart. I have several pads in various dimensions and a big roll of it too. Love. the. stuff.

Here you can just make out Humpty on his wall.  Woods beyond the wall, and a garden on this side of the wall as well as a path looping out from the wrought iron gate next to Humpty. A big blue sky above and lots of puffy clouds completes the piece. The image dimension will be about 20 X 36".  At least thats the plan right now. Always room for alterations if something doesn't look quite right. Collages are forgiving that way. :)


 Here's Humpty's body. I drew out the egg separately and then traced each limb on a separate piece of tracing paper until they were all just right and then I had fun attaching his limbs appropriately. I wanted him to look rotund (of course) and very precariously wobbly. This is that sick moment that he knows he's going to fall but hasn't quite yet but knows its inevitable.
 I wasn't sure about facial expressions so I tried a couple of different ones out, also on a separate piece of tracing paper. Here's shocked and disbelieving. His mouth is just kind of hanging open.
And here's horror/fear. Mouth is in full scream mode.

I may have to sketch out a couple more. I'm still not quite sure which one I like the best. Right  now I'm leaning a little towards the first one (above).

I dunno. Have to sleep on it. I could also do the old mirror trick: when you're having trouble with a composition, look at it in a mirror; flaws and issues just jump out at you (and are thus fixable). I can't wait to get this all pinned down and start choosing fabrics. That's one of my favorite parts!

Here are a couple of commercial links as usual. Tracing paper, of course and my all-time favorite version of Mother Goose. The illustrations are charming and intricate--beautiful (something I always look for in a children's book that I am likely to read out of repeatedly).


Monday, April 25, 2011

Odds and ends in red red red

 Not too much creating going on in the last week but here's a sweet picture of my beautiful daughter wearing her felt flower that I made a couple of weeks ago and posted about.
She wore it in to school and even wore it to her volleyball game that evening.

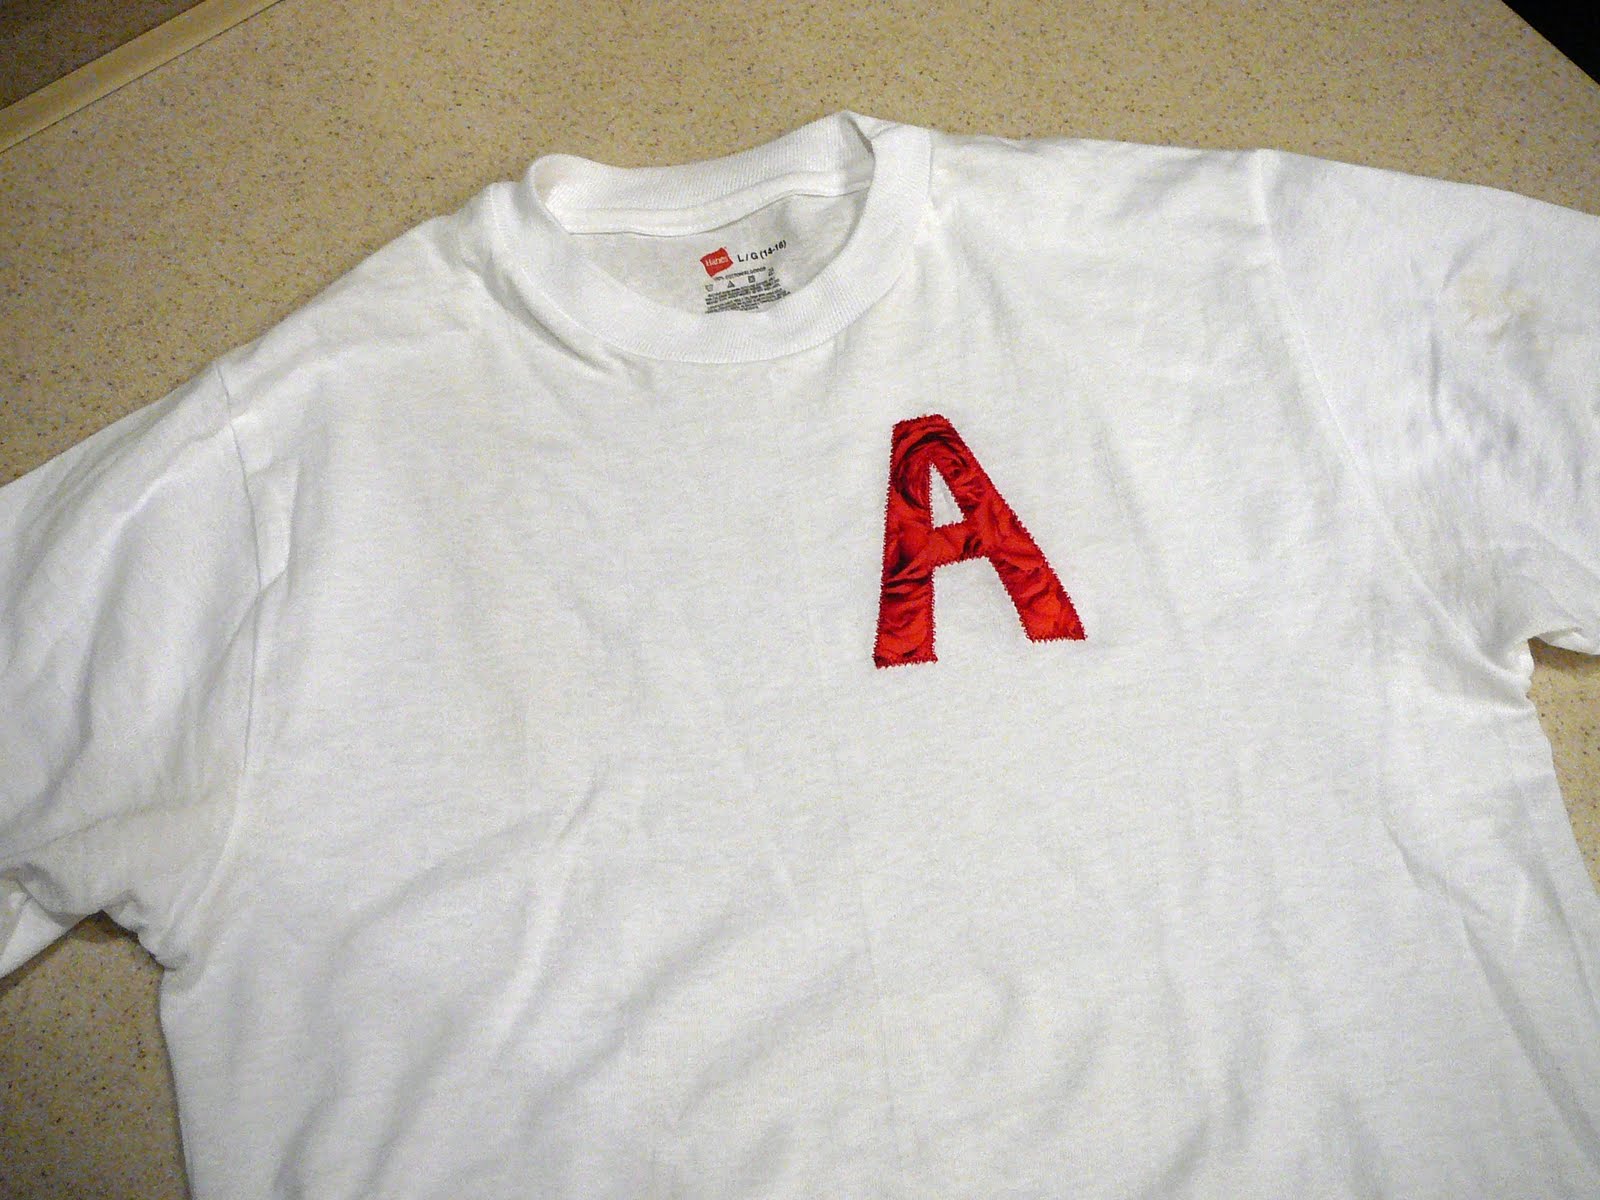
While I didn't create any major art this week, I did help Fiona with a big school book project today. She has to give a powerpoint presentation, wear a costume, provide a snack, handouts and a quiz based on her book. So I helped with the costume of course. After a little embellishing of a spare white T-shirt and some scrounging in my closet we came up with a pretty decent assembly of clothes. Here's my sewing contribution--you get one guess as to the name of her book. :)

I stabilized the rose print cotton fabric with Shir-Tailor fusible interfacing Pellon Shir-Tailor Fusible Interfacing- 20 Inch W x 25yds, cut out the A and then stitched it down using a decorative diamond stitch. On the inside of the shirt I placed some Tearaway embroidery stabilizer Regular Tearaway 8x8 200 Precut Sheets for Embroidery Machines. That way the cotton fabric doesn't shift or fray and the stretchy T-shirt knit doesn't give and stretch too much while I'm sewing. For a quickie project--turned out pretty good!


Wednesday, April 13, 2011

Universe Box


Did I tell you I love felt? Well, I do. So here's some more felt fun (although it may not look it at first glance.) A while back I made this cute little fabric (and felt!) covered box. I stiffened it with a wonderful product called Timtex  Timtex Interfacing Craft Pack. Its a very stiff synthetic interfacing that can still be sewn and ironed. Think of it as a sewable cardboard, if you will. I keep it on hand for any quilting projects that need a stiffer batting (points that stand out etc.)

I made this box with a removable lid and sewed a celestial fabric cover for it. I wanted a little surprise on the inside so I lined it with bright yellow felt (ah...there's the felt connection!). I call it my "Universe Box".

When all of the parts were assembled, I blanket stitched it all together with a gold lurex thread. There are metallic gold highlights in the fabric so I thought that tied it all together.


On a related note, I went to my local book store yesterday and guess what cried out to me from the shelf? You guessed it-- a felt project book. Ooooo, I'm so excited to try out one of the projects. Its called Big Little Felt Universe: Sew It, Stuff It, Squeeze It, Fun! by Jeanette Lim. Just check out the apple on the cover! So cool. Can't wait to try something out! This lady is a true felt artist--check out her etsy shop that features her incredible creations (and patterns) at: http://www.etsy.com/shop/umecrafts.

I'm only sorry I have to go to work today. :(


Monday, April 11, 2011

Et voila!!--Ikea pillow done!

Whew! Still playing catch-up with my pix. I finished my pillow about a month ago so....here's that pesky Ikea pillow all finished at last! And what have I learned? Cylinders are a bitch. My advice? Think twice before you start one--way more complicated than it looks.
That said, I am happy with it and glad I made the cover but its pretty unlikely that I'll make another one to match my other sheets.

Sunday, April 10, 2011

Feltastic

I think felt is a drastically underused textile--I've used it in the past and really enjoyed its qualities. A couple of days ago I came across a great project on another blog: not martha http://www.notmartha.org/. OMG! A beautiful felt flower pin--right up my alley. I'm not going to post a tutorial since Megan already did an excellent job of that; do be sure to visit her blog and check it out. Here are the lovely results...

I made two of these pretty felt flower pins so far and have another under construction. Each petal is made individually and is sewn down to a felt covered base of cardboard.

I think they look a little sun-like, don't you?
Fiona, my daughter, came home from a party and fell in love with the red one so I gave it to her. She plans on wearing it to school tomorrow.

Now I'm thinking about how to make other flowers besides dahlias.  Or maybe some embellishment. Or different sizes? With a leaf or two?  Hmmmmm--the possibilities are endless!

Friday, April 08, 2011

Christmas cards leftovers

I was scanning the archives today and realized that I never posted the 2010 Christmas cards. Shame on me! So without any further ado, here they are. 2010's cards featured some filamentous yarn and some heavy textured paper from a gift bag. I started with a large hole punch....


Isn't it great? I'm pretty good at cutting things out but there's no way I can cut a perfect, smooth circle. This punch (from Michaels, or see the one here: Uchida LV-SJCP40 Clever Lever Super Jumbo Craft Punch, 2-Inch Circle) takes care of that issue in a snap,


A gift bag was sacrificed to yield these beautiful circles in a red metallic paper with an alligator texture finish. Very eye-catching!


Here's my tree branch made out of that filamentous yarn (a swipe of glue stick Avery Glue Stic, 0.26 oz, Pack of 6, (98095) holds it down) and the ornament I punched out. I've adhered my ornament with a raised adhesive stickers.


And I couldn't forget the little thingamabob on top of every ornament!  So I covered a sticky dot with aluminum foil, shaped it a bit and then stuck it into place.


Not bad! I really like the dimensional aspect of the ornament and the yarn. Silver ink was drawn in to indicate the ornament's hook. And then they were all signed at the bottom as usual.


Unfortunately I ran out of the green yarn so a few cards went out with iridescent white branches. (uh, snowy, right??!)


Then that ran out too and some post-modern versions went out with purple branches and gold ornaments (kind of an LSU theme).  So much for Christmas 2010! Wonder what the 2011 cards will be? hmmm

Tuesday, March 29, 2011

Thanksgiving (cupcake) leftovers!

Sorting through my pictures today (while watching Cupcake Wars on tv; love that show) and came across this gem that I had meant to post last Thanksgiving. This lovely cupcake (!) was made for my son Ed by his girlfriend, Mariah. Isn't it incredible? And edible! And delicious! Or at least, so said Ed. I only got to photo-document it. Ah well, I appreciate the feast for the eyes that it continues to be.

Wall treatments

Hi all,
I know, I know--its been a loooong time. My apologies. That's what happens when you get divorced and start working full-time! Gack! But here's a new post dealing with wall treatments.

Like many folks, I have painted walls and even dabbled a bit in some so-called "faux" finishes. It can be lots of fun. Be not afraid! Get a good reference book--I particularly liked Sunset's guide Decorative Paint & Faux Finishes--read up and go to it! Don't be afraid to try new techniques. And don't be afraid to paint right over them if they don't work. (For that reason, I stay away from textured treatments; much harder to cover up a mistake.)
Here's my first wall treatment. We painted our living room a deep gold color and had a lot of gold accents in the room. So I though a metallic gold would be appropriate on the walls too. The crown molding got painted with a flat yellow latex and then was streaked with a metallic gold paint and a simple stencil was applied as a border directly underneath all around the room. I thought it turned out handsomely.


 Here is the wall at a higher magnification. I loved the look of the gold stencil paint so much that I did an all over gold stencil in the dining room next door. You can just make it out through the doorway. It took me quite a while to go around and do the whole room but it was worth it (and covered up the flaws in the drywall, to boot.)
In this dining room wall, I did a fairly complex faux finish and then completed the look with star stencils. I started with a layer of orange paint (pumpkin orange!) and then mixed a deep red paint half and half with some glaze. I then dry-brushed the thin red paint over the orange. It took three layers to get the effect I wanted. Then I applied hundreds of star stencils in gold, dense at the top and falling down and thinning out at the bottom. 

For all of the stenciling I used Delta Stencil creme oil paint Delta Stencil Magic Paint Creme Folk Colors Traditional--it was very easy to work with and gave great results. Love, love, love, the metallic gold especially.


Sunday, September 19, 2010

Gyotaku T-shirts


I was cleaning out and poking around in my studio yesterday and came across this project: some Gyotaku t-shirts I did with Fiona's kindergarten class a few years ago. Gyotaku is a Japanese technique for making prints or rubbings from fish. Its a traditional craft and very beautiful. Usually its done by inking a fish or sea creature and then pressing or rubbing paper on top.

I adapted this method for the kindergartners as a class project. They needed shirts depicting red fish since they were doing a production of Swimmy. Swimmy (Knopf Children's Paperbacks) I started by experimenting a little and ended up using acrylic paint brushed onto a fish and then rubbing a shirt on top of the fish.

Turned out very well!  This is a trial run shirt, The shirt the kids did had just a single fish. Aren't the details of the fish great? Using acrylic paint was perfect. Easy to work with and clean up. After the print was completely dried on the shirt (24 hours), I heat set it with a dry iron. After that, the shirt was safe to wash in cold water with no running or fading.

I may have to do this again soon--it was a lot of fun!