Hello friends. I'm still recovering from moving and so I have no new creations to blog about. :(
I'm almost done unpacking, though, and I have a bunch of great ideas I'm just dieing to implement so stay tuned. It will be soon, I promise.
In the meantime, I am deactivating the comment option on my posts. I've been getting daily weirdo spam comments that are hijacking my site for their own nefarious purposes. I'll leave it off for a while and reactivate in a month or so. Sorry for any inconvenience!
Thursday, April 26, 2012


Wednesday, March 28, 2012
Cork trivet. and a question
Here's my last catchup craft: another nice cork trivet. I have a goodly supply of corks (some that I have generated, many that came from a supportive restaurant) and I'm always looking for a new craft to use these babies. [You should have seen the castle we built for my daughter's 3rd grade project! sorry, no pix]
Ah well, this trivet is not nearly as exciting as that castle was, but I came across a spare vent clamp and I had sold my other two cork trivets so here was a quick and easy creation.

So I made this little cutie and it was the first thing I uploaded in my slew of items onto my etsy site. That process always takes a little while to write out the product description, tag it etc. Well, I had no sooner finished with this item and started to upload the next item when I got a little ding from my Paypal app indicating a sale. Yes, indeed, my little trivet had sold within the first 15 minutes! Woohoo!
Now here's my next little dilemma: I've been making several trivets out of these natural corks, and I even have a couple of future projects in mind. But what do I make with those artificial corks? I have a bunch of those, too. But they just don't have the same vibe, ya know? So..... something funky and kitschy? But what?
Hmmmmm
Ah well, this trivet is not nearly as exciting as that castle was, but I came across a spare vent clamp and I had sold my other two cork trivets so here was a quick and easy creation.

So I made this little cutie and it was the first thing I uploaded in my slew of items onto my etsy site. That process always takes a little while to write out the product description, tag it etc. Well, I had no sooner finished with this item and started to upload the next item when I got a little ding from my Paypal app indicating a sale. Yes, indeed, my little trivet had sold within the first 15 minutes! Woohoo!
Now here's my next little dilemma: I've been making several trivets out of these natural corks, and I even have a couple of future projects in mind. But what do I make with those artificial corks? I have a bunch of those, too. But they just don't have the same vibe, ya know? So..... something funky and kitschy? But what?
Hmmmmm
Friday, March 23, 2012
Floral Coasters
 Moving got started and its just as fun as I remember. not! So no new creating but I remembered I did have a have a little bit of a backlog so I'll just get caught up on that, shall I?
I finished this project up last weekend too, and it was a quickie. I had bought some cork coasters recently on one of my many supply expeditions to Michael's thinking that I'd Mod Podge something to them at some point. So when that old floral art calendar turned up I knew just what to do.
 I thought that the circle of art looked a little unfinished when I held it up to the coaster so I got out my trusty gold marker and rimmed a gold edging all the way around on all 4. That served to really finish each individual circle and helped to tie them all together as a set as well. For a brief moment I stressed because the edging was uneven but then I decided I liked that look. It was more organic, much like the subject matter of the art itself.
So now, after this successful Mod Podge project, I'm kind of eyeing all of the furniture in the house and wondering to myself: "Hmmm, wouldn't that look better if it had some art on it?" or "That really is crying out for a butterfly" or even "This could be completely papered in a vintage map". Stay tuned!
Thursday, March 22, 2012
Domino Pendents with Dangling Bits
Over the weekend I completed some more domino pendents. I has rediscovered an old floral art calendar that I just couldn't bear to throw away when the year was over. Some of those calendars have very high quality reproductions so I alway keep them. Same for those little postcard books too. I also thought that I would add some more embellishments in the form of some extra dangling beads. Here are a some of my favorites.


This time I used Diamond Glaze on top of the adhered image and I think I like that product just a little bit better than the dimensional Mod Podge that I used in the last go round. It seemed to dry clearer and more glass-like.
I will be moving this coming weekend and the next so I'll be taking a break from crafting. :(
But after that I'll be in my grand new place and happy to get going on several planned projects. :)

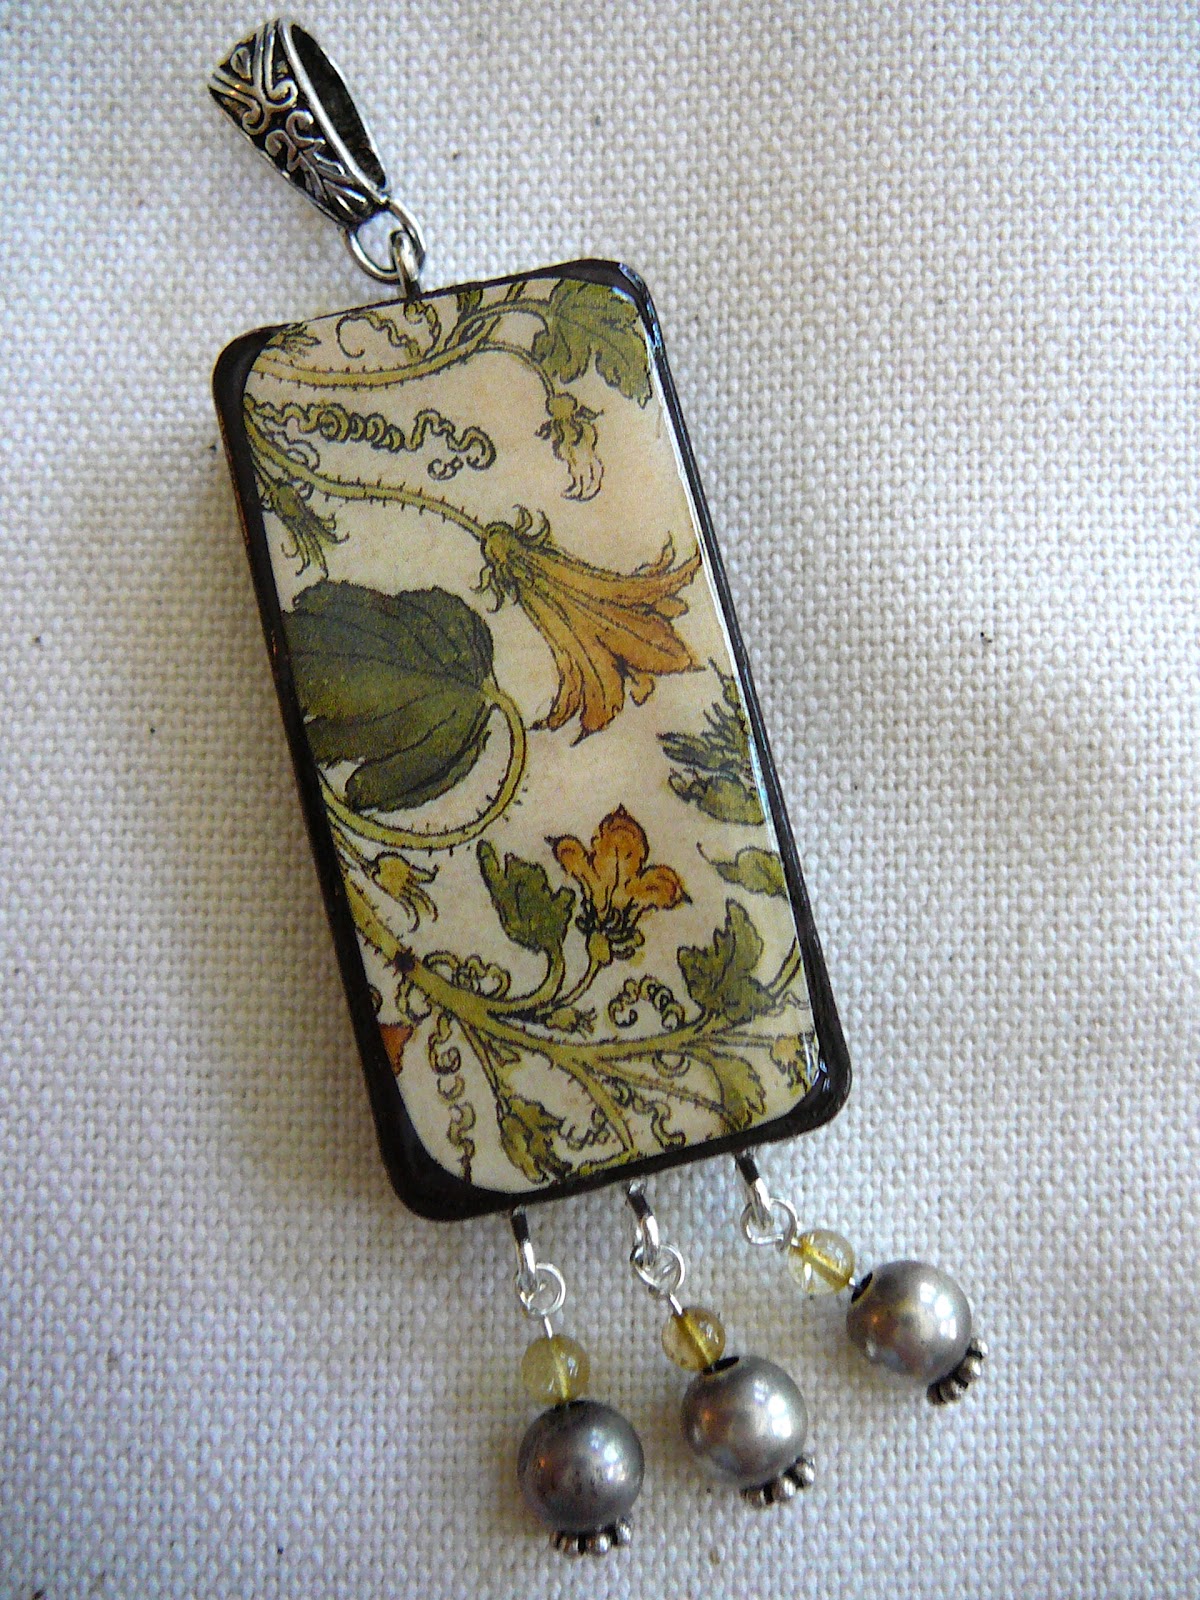


This time I used Diamond Glaze on top of the adhered image and I think I like that product just a little bit better than the dimensional Mod Podge that I used in the last go round. It seemed to dry clearer and more glass-like.
I will be moving this coming weekend and the next so I'll be taking a break from crafting. :(
But after that I'll be in my grand new place and happy to get going on several planned projects. :)
Wednesday, March 21, 2012
LizzieLuvs2Recycle Logo
Ooooo. I'm so excited. I've been steadily selling larger and smaller items from my LizzieLuvs2Recycle shop and I figured it was time to continue to evolve--time for some "branding" if you will. And, this past week I purchased a wee bit of advertising space on an online craft magazine and that prompted me to get my creative juices flowing with regards to a real logo that I can use on all of my correspondence and paperwork and hopefully integrate into the shop website somehow. Thus far I have been including a handwritten note on one of my art note cards thanking people for their purchase and I just felt that I needed to step up the professionalism.
The first step in generating some cool paper goods and packaging was designing an appropriate logo to use. Working with a very helpful and knowledgeable expert with Photoshop, the two of us were able to design a logo and an ad for my shop at etsy.com: (https://www.etsy.com/your/shops/LizzieLuvs2Recycle) this morning in record time.

Here's what we came up with for the logo. Isn't it grand? Its just what I was envisioning, too.
And then we took that logo and did a little addition and manipulation to come up with the ad that I will be submitting to Tru(4)ia Magazine. (I'm not quite sure where the ads are going to appear there, but I'll keep you posted on that.)

They wanted copy that was 3.5" x 2 " which just happens to be the size of a business card, so I think I might just have have some of those made up too.
Serendipity all the way around, no?
The first step in generating some cool paper goods and packaging was designing an appropriate logo to use. Working with a very helpful and knowledgeable expert with Photoshop, the two of us were able to design a logo and an ad for my shop at etsy.com: (https://www.etsy.com/your/shops/LizzieLuvs2Recycle) this morning in record time.

Here's what we came up with for the logo. Isn't it grand? Its just what I was envisioning, too.
And then we took that logo and did a little addition and manipulation to come up with the ad that I will be submitting to Tru(4)ia Magazine. (I'm not quite sure where the ads are going to appear there, but I'll keep you posted on that.)

They wanted copy that was 3.5" x 2 " which just happens to be the size of a business card, so I think I might just have have some of those made up too.
Serendipity all the way around, no?
Saturday, March 17, 2012
I'm still enjoying t-shirt yarn knitting and wanted to branch out from my semi-circular pattern so after a little pattern research I adapted a pattern more typically used for scrap yarn to make afghans. Once again I used my largest needles (#17) and just started knitting. I really liked how it turned out, I'll likely make another one when I have enough yarn scraps gathered again.

My daughter, Fiona, makes a lovely foot model, doesn't she? She had just the perfect shade of nail polish on her toes, too. Like the other mats that I have been making, the body of the mat is basically garter stitch so it is surprisingly soft and cushy to stand on. Here's a close up:

I have to say, T-shirt yarn is really nice to work with--its soft and has some stretch/give to it. If you haven't tried it, I highly recommend you make some yarn (or buy some on etsy) and give it a go!
On a completely different creative note, I've been dabbling in a little photography as well. Here's my favorite picture of one of my window plants. I shot a bunch of pictures of this bunch and the lighting on this one was the best.

That's all for today. I have some more domino pendents in the works so I hope to get those finished, photographed and posted soon.

My daughter, Fiona, makes a lovely foot model, doesn't she? She had just the perfect shade of nail polish on her toes, too. Like the other mats that I have been making, the body of the mat is basically garter stitch so it is surprisingly soft and cushy to stand on. Here's a close up:

I have to say, T-shirt yarn is really nice to work with--its soft and has some stretch/give to it. If you haven't tried it, I highly recommend you make some yarn (or buy some on etsy) and give it a go!
On a completely different creative note, I've been dabbling in a little photography as well. Here's my favorite picture of one of my window plants. I shot a bunch of pictures of this bunch and the lighting on this one was the best.

That's all for today. I have some more domino pendents in the works so I hope to get those finished, photographed and posted soon.
Thursday, March 08, 2012
Catching up
So I finally got all of my t shirt tutorial up and posted and was all ready to post about some fun stuff when, zowie my computer went out. Yikes! I felt so lost--couldn't post on my blog, upload new items for sale in my etsy shop, pay bills, check work email--eeek! Luckily, I realized what was happening (power supply cord went bad) so with my computer's last gasp of charge I ordered a new one online. And it just came--hooray!
So what have I been up to??
Well, I've been knitting t-shirt yarn like there's no tomorrow:

Here's a blue one...

And here's one in a warm colorway for my new kitchen.
Recently, a friend asked if I could donate an energy pop top necklace for a silent auction she is helping to organize. Here's what I came up with on that front:

(Can you tell my son loves the green flavor?)
I finally got really really disgusted with my stained ironing board cover so I made a new one. It only took me half an hour or so and I used fabric I already had. So now I'm thinking "what the heck took me so long to do this???"

I also added some additional padding which it sorely needed. Here's a close up of the fabric: very 60's--I love this sort of motif.

And last, but most certainly not least, I've been teaching a couple of lovely ladies how to sew on Sundays. Here are Fiona and Lauren who have both just completed pockets for shorts or apron, respectively.

Stay tuned for the completion of shorts and apron!
So what have I been up to??
Well, I've been knitting t-shirt yarn like there's no tomorrow:


And here's one in a warm colorway for my new kitchen.
Recently, a friend asked if I could donate an energy pop top necklace for a silent auction she is helping to organize. Here's what I came up with on that front:

(Can you tell my son loves the green flavor?)
I finally got really really disgusted with my stained ironing board cover so I made a new one. It only took me half an hour or so and I used fabric I already had. So now I'm thinking "what the heck took me so long to do this???"

I also added some additional padding which it sorely needed. Here's a close up of the fabric: very 60's--I love this sort of motif.

And last, but most certainly not least, I've been teaching a couple of lovely ladies how to sew on Sundays. Here are Fiona and Lauren who have both just completed pockets for shorts or apron, respectively.

Stay tuned for the completion of shorts and apron!
Monday, March 05, 2012
T-shirt tutorial continued even further
Now just keep on cutting around and around that sleeve and then the next sleeve and then the neck in the same fashion. Cut through the seams--they'll be a bit bumpy but whatthehell. You'll end up with 3 shorter strips that you will need to attach to the first ball of yarn you made. Here's how to do it without making a hard lump:

Fold the tip of each end over by an inch or so and snip a vertical slit in the center that is about half an inch long. Unfold both tips and and lay them on top of each, holding the larger ball's strip on the left and bottom and the shorter strip on the right and top.

Butt them head to head as shown and then overlap them right side to right side, shorter strip on the right and top. Poke the tip of the right and top strip through the slit of the strip underneath. Once it is inserted by a couple of inches, loop it back on itself and insert a further back portion through its own slit.

Carefully pull the entire length of the sleeve strip through its slit.

Fiddle with the two ends as necessary, pulling both straight so they are not folded over on themselves but are nested together and extended in both directions.

Pull tight--the junction should practically disappear.
The neck section will yield some more irregular yarn and bumpier shoulder seams but I think that adds interesting texture. After removing the neckband, just cut around and around the neck opening until you run into the sleeves. When you're done, there shouldn't be much t-shirt left!

Now that's recycling!

Fold the tip of each end over by an inch or so and snip a vertical slit in the center that is about half an inch long. Unfold both tips and and lay them on top of each, holding the larger ball's strip on the left and bottom and the shorter strip on the right and top.

Butt them head to head as shown and then overlap them right side to right side, shorter strip on the right and top. Poke the tip of the right and top strip through the slit of the strip underneath. Once it is inserted by a couple of inches, loop it back on itself and insert a further back portion through its own slit.

Carefully pull the entire length of the sleeve strip through its slit.

Fiddle with the two ends as necessary, pulling both straight so they are not folded over on themselves but are nested together and extended in both directions.

Pull tight--the junction should practically disappear.
The neck section will yield some more irregular yarn and bumpier shoulder seams but I think that adds interesting texture. After removing the neckband, just cut around and around the neck opening until you run into the sleeves. When you're done, there shouldn't be much t-shirt left!

Now that's recycling!
T-shirt yarn tutorial continued
If you've been on the edge of your seat since I started to post about T-shirt yarn and couldn't finish I'm here to put you out of your misery! :)
When I left off the other day I had cut up the main body of the shirt and was preparing to work on the sleeves and neck-line. A word of warning: cutting into the sleeves and around the neck opening means you will be incorporating under arm and shoulder seams and thus will make a slightly lumpier or uneven yarn. I'm OK with that, but you may not be. Read on and decide for yourself!

And here's the whole cut up pile of one continuous spiral strip. I used to just wind it up as is, but with a little magic, you can turn it into proper yarn. Just pick up a yard's length at a time and streeeeeetttccch it out. Both edges will curl under and Voila!

And the best part is that, once stretched, it stays that way. So do that, a yard at a time and then winding into a ball until you have it all done.

Now its time to attack the sleeves.


When I left off the other day I had cut up the main body of the shirt and was preparing to work on the sleeves and neck-line. A word of warning: cutting into the sleeves and around the neck opening means you will be incorporating under arm and shoulder seams and thus will make a slightly lumpier or uneven yarn. I'm OK with that, but you may not be. Read on and decide for yourself!

And here's the whole cut up pile of one continuous spiral strip. I used to just wind it up as is, but with a little magic, you can turn it into proper yarn. Just pick up a yard's length at a time and streeeeeetttccch it out. Both edges will curl under and Voila!

And the best part is that, once stretched, it stays that way. So do that, a yard at a time and then winding into a ball until you have it all done.

Now its time to attack the sleeves.

Cut off the hem. You will note that there is less fabric in the underarm area than in the shoulder. You can compensate a little and get more spiral by cutting your strip slightly narrower there and wider at the shoulder. You won't really notice any difference in your yarn quality.

Start at the underarm seam as shown and cut a wedge to start your strip.

Now just keep cutting around and around. Sorry, the rotary cutter is not an option here (I was going to make a very bad pun, as in: the rotary cutter just won't cut it, but I held myself back, aren't you glad?)

When you get to the seam, just cut right through it. It will be OK, I promise.
Wednesday, February 22, 2012
T-shirt yarn tutorial
I promised to post my tutorial on T-shirt yarn production and so here it is. There are other tutorials out there that are just fine too, but this is my own take on the process, combining a few steps here and there to get the most yarn out of each and every T-shirt.
Start with....a T-shirt (you saw that coming, right?). Any T-shirt will do, from toddler size to men's XXXL. Obviously, you will get more yarn out of the latter.
 Here's my T-shirt du jour, thanks to the my sister who cleaned out her closet and sent me a bunch of T-shirts--(thanks, Sissy!). I have cut off the bottom hem and cut across from one armpit to the other, leaving a big tube at the right.

Cut 1 inch wide strips from the bottom to the top, leaving the strips attached by a couple of inches at the top. Exact measurements are not necessary.

That's a lot of strips to cut by hand so a faster method is to use a rotary cutter. Either way works but the rotary cutter is faster and easier on your hands (if you're prone to arthritis or other hand stiffness).

And here is my completely cut tube. Not to worry about the ragged edges of the hand cut strips on the right--all of that will disappear.


Start cutting from the outside edge at the beginning of the joined section and continue cutting inwards on a slant to the first cut.

Now jump up one strip and make a cut parallel to your initial one, hopping up to the next strip each time as you go. So instead of cutting individual T-shirt rings, you are making one glorious spiral! Don't worry if that part looks uneven or more slanted than the rest of the strip, it will all even out. Keep on doing this to all of the strips until you get to the last one.

Start with....a T-shirt (you saw that coming, right?). Any T-shirt will do, from toddler size to men's XXXL. Obviously, you will get more yarn out of the latter.


Cut 1 inch wide strips from the bottom to the top, leaving the strips attached by a couple of inches at the top. Exact measurements are not necessary.
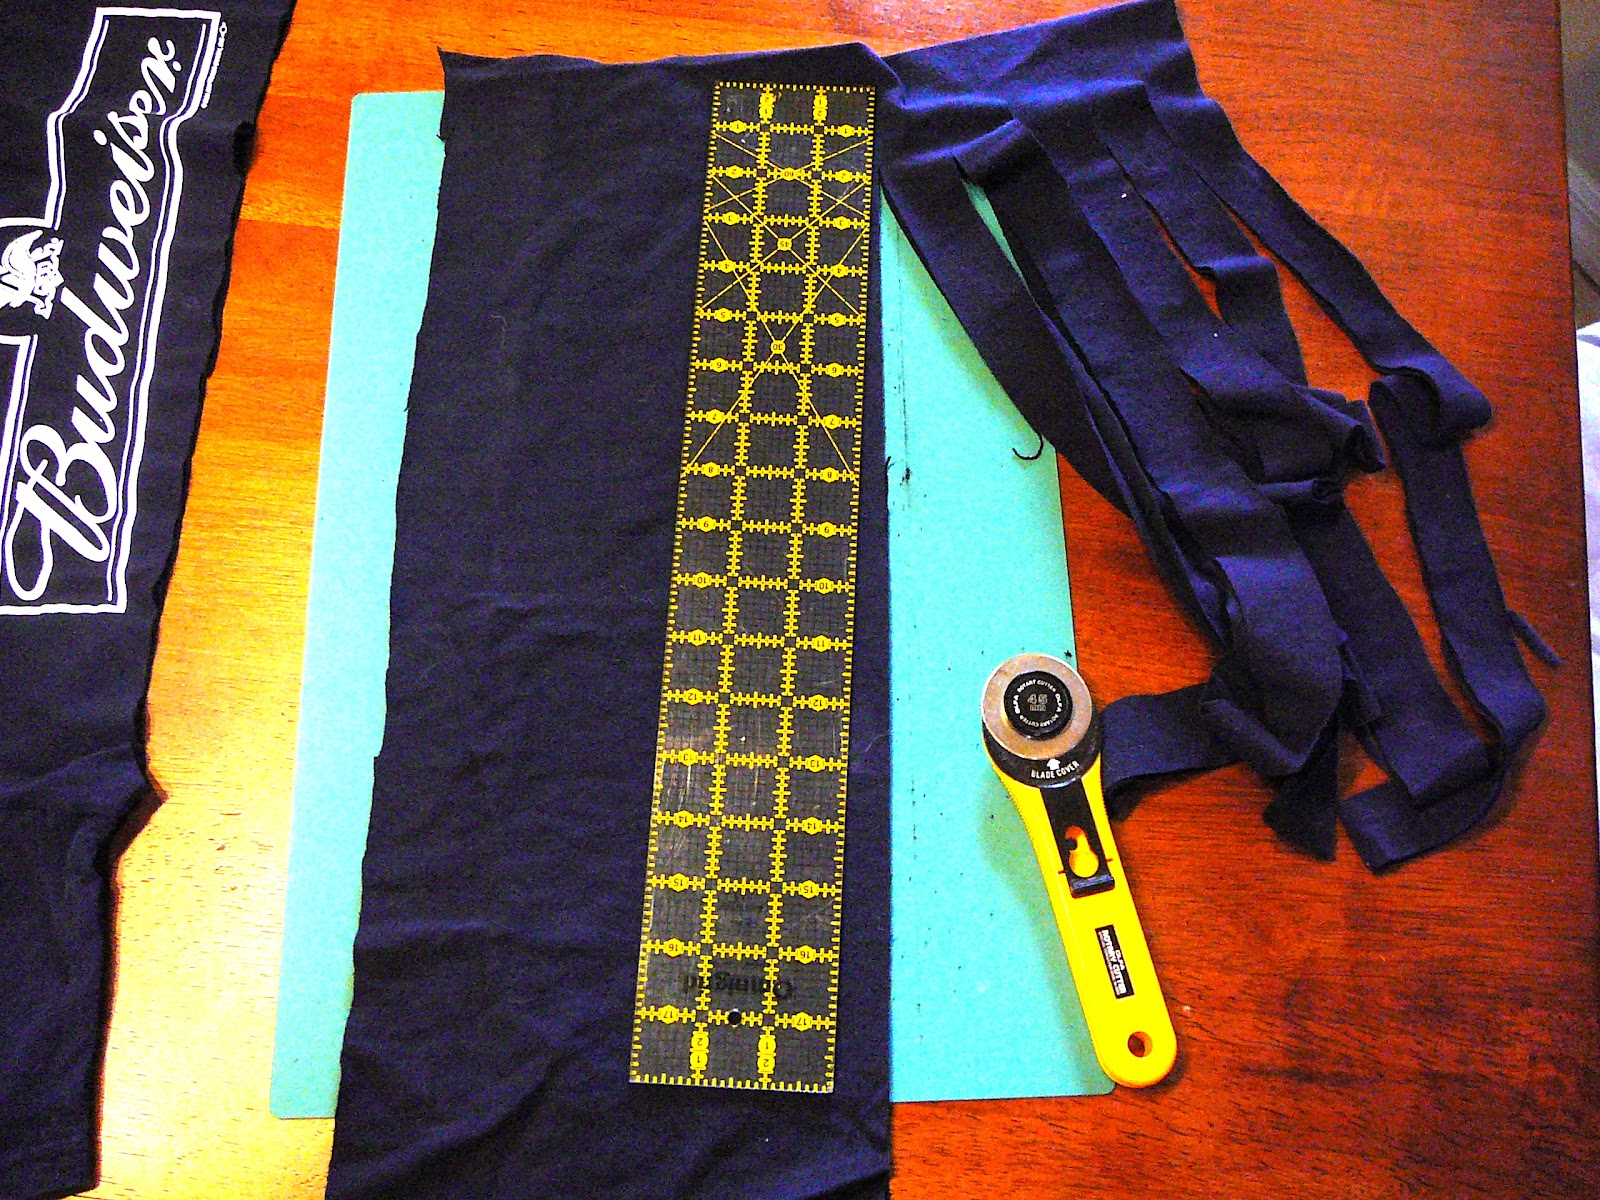
That's a lot of strips to cut by hand so a faster method is to use a rotary cutter. Either way works but the rotary cutter is faster and easier on your hands (if you're prone to arthritis or other hand stiffness).

And here is my completely cut tube. Not to worry about the ragged edges of the hand cut strips on the right--all of that will disappear.

Now, unfold the uncut edge and spread out the strips top and bottom. Hold on to your hats--here comes the magic part!


Now jump up one strip and make a cut parallel to your initial one, hopping up to the next strip each time as you go. So instead of cutting individual T-shirt rings, you are making one glorious spiral! Don't worry if that part looks uneven or more slanted than the rest of the strip, it will all even out. Keep on doing this to all of the strips until you get to the last one.

Here is the end of the line! Make the last cut on a slant to the outer edge and you are done with this stage.
If you want perfectly smooth yarn, stop here--many folks do. Personally, I feel like there is still a lot of T-shirt left to harvest so I continue on with the sleeves and the neck and attach those to main segment created here. I'll show you how to attach the 3 additional pieces without any messy and lumpy knots, too.
I'm having trouble posting additional pictures so I'll finish the process in another post tomorrow. Stay tuned!
Tuesday, February 14, 2012
Knitted rugs revisted
Remember when I first started messing about with t-shirt yarn? I made a few bath mats by crocheting ovals and a circle and was not too thrilled (I'm just not a great crocheter). Then I knit a trivit (turned out ok) and tried knitting a bath mat but the thing was so ugly I ripped it all out again. I decided that the time had not yet come and, more importantly, the pattern had not yet been discovered that would yield the optimum results.

 Well, glory be, I found that magical perfect pattern and spent a happy happy weekend cutting up t-shirts and knitting. The pattern actually calls for a cut up king size flat sheet for the yarn but I knew that t-shirt yarn would work (and I think work even better). You can download the free pattern here. This pattern is worked on flat needles but through the magic of short rows makes a semi-circular or circular rug. Here you can see I'm about halfway done. You work this pattern wedge by wedge and the pointy edging
is worked along at the same time. A very well thought out pattern indeed!
And here's a detail of one of the edges. I knit this on my biggest needles that I had (17) and that made a nice and thick and cushy texture. Very soft to stand on. I'm pretty sure if you made this out of sheet strips that that would not be the case.
And here is the finished mat--SO cool. I'm moving in April so I think I will save this for my new master bath. I may have to make another 2 or three as well as gifts and such.
As you can see, it takes six wedges to make a mat. I used approximately one adult t-shirt for each wedge. 12 wedges would make a full circle.
 I'm starting on a blue one as a gift for a neighbor next--so fun.
I'll try to remember to post a tutorial on cutting up t-shirts the quickest and most thorough way soon. Craft stores and various etsy folks have started to sell the stuff (a little pricey), but heck, you can easily make it yourself for free!

 Well, glory be, I found that magical perfect pattern and spent a happy happy weekend cutting up t-shirts and knitting. The pattern actually calls for a cut up king size flat sheet for the yarn but I knew that t-shirt yarn would work (and I think work even better). You can download the free pattern here. This pattern is worked on flat needles but through the magic of short rows makes a semi-circular or circular rug. Here you can see I'm about halfway done. You work this pattern wedge by wedge and the pointy edging
is worked along at the same time. A very well thought out pattern indeed!
And here's a detail of one of the edges. I knit this on my biggest needles that I had (17) and that made a nice and thick and cushy texture. Very soft to stand on. I'm pretty sure if you made this out of sheet strips that that would not be the case.
And here is the finished mat--SO cool. I'm moving in April so I think I will save this for my new master bath. I may have to make another 2 or three as well as gifts and such.
As you can see, it takes six wedges to make a mat. I used approximately one adult t-shirt for each wedge. 12 wedges would make a full circle.

I'll try to remember to post a tutorial on cutting up t-shirts the quickest and most thorough way soon. Craft stores and various etsy folks have started to sell the stuff (a little pricey), but heck, you can easily make it yourself for free!
Wednesday, February 08, 2012
Pendents and cabinets
I'v been a busy little bee in all sorts of arenas lately so here are some more finished projects! I'm always so happy when I can talk about finished pieces because I have so many (ahem) unfinished ones floating around. I have to work very hard at not feeling guilty about that (a wasted stupid emotion) and instead let each piece progress and grow at its own pace. Or something. I just wish some pieces (and you know who you are!) wouldn't take years to incubate. [see how I did that? its not my fault I have a bejillion projects underway]
 Here's the latest in my cigar box cabinets. Note the beautiful woods used on the boxes. Gosh, they sure are pretty. No cigar box labels for these lovelies! The logos are simply burned or imprinted into the wood and stained. Notice the dove tailing on the edges? So nice.
This time I used very small and demure knobs to help me grasp each box and pull it out from its shelf. You hardly even notice them, huh?
And here's a picture of all of the cabinets I've made so far nestled all up together all snug and friendly in my studio. They look happy I think.

Should I make some more? I do have a few more boxes. Well, we'll see.
But as I mentioned in the last post, this past week has been all about domino pendents. Yesterday I finished 8 more. Fiona, my daughter, ran off with one of them, so here are the remaining 7.
 This batch turned out better than the first two as far as the surface sealer was concerned. I don't know what I did differently but the sealer dried crystal clear and was perfect. I used a mixture of different images: another Frida Kahlo portrait, 3 Tarot cards from the Major Arcana, 2 screen shots from Pocket Frogs (my current fav iPhone game) and even a close up from one of my quilts.
And now I truly do have the whole process ironed out and the whole thing is a breeze to complete.

This time I used very small and demure knobs to help me grasp each box and pull it out from its shelf. You hardly even notice them, huh?
And here's a picture of all of the cabinets I've made so far nestled all up together all snug and friendly in my studio. They look happy I think.

Should I make some more? I do have a few more boxes. Well, we'll see.
But as I mentioned in the last post, this past week has been all about domino pendents. Yesterday I finished 8 more. Fiona, my daughter, ran off with one of them, so here are the remaining 7.

And now I truly do have the whole process ironed out and the whole thing is a breeze to complete.
Monday, February 06, 2012
Domino Pendents
Currently, I've been enjoying making some more jewelry from recycled materials. I had pinned several tutorials for pendents using a base of Scrabble tiles on my Pinterest boards but they all struck me as being rather smallish. So when I saw the same technique depicted with a domino tile instead I was much more interested. And it just so happens that we had a vintage set of 'em laying around the house that no-one much bothered with. So with a little shopping for the sealer and the hardware, I was in business. Here are my first two efforts made from materials that I mostly already had.
 A book of stickers of Frida Kahlo's artwork supplied the image for the first piece and it was easy to choose an appropriately sized sticker for the domino. The second one features a word trimmed from one of those vintage cigar box labels I found on Ebay a month ago.
Ebay came to the rescue again for the findings: the small silver tone screw eye and the Bali style bail. Seriously, I think you can find just about anything on Ebay.
 Of course, almost every new project type necessitates at least one trip to Home Depot and this was no exception: the insanely small screw eyes that hold the bail (loopy thing) were not large or strong enough to just screw into the wood (which is, of course, ebony) so I needed to drill a hole. A tiny, tiny hole. So a new universal chuck and a mini drill bit set for the dremel tool we already owned was in order. Sigh. So much for a cheap project.
That's OK. I'm all set now and have another 8 in the works! So stay tuned, I'll post them soon.

Ebay came to the rescue again for the findings: the small silver tone screw eye and the Bali style bail. Seriously, I think you can find just about anything on Ebay.

That's OK. I'm all set now and have another 8 in the works! So stay tuned, I'll post them soon.
Sunday, February 05, 2012
Pizza extravaganza
Its been a couple of weeks and I have lots of goodies saved up for posting. But I'll spread them out a little over the next couple of days. So check back, ok?
I haven't posted about any food items in a long time so I think its definitely time to get those taste buds tingling. No sweets today, but some lovely home-made pizzas. Those of you who know me in real life, may remember that many long years ago I put myself through school working in a variety of pizza joints. So I appreciate a good pizza and really looove a great one. We've had a few delivery pizzas lately and they've been OK (except when I accidentally ordered some bizarro combination one time when I was just a little bit tiddly. OK, maybe more than a just little bit, but that's why I was staying home and not driving anywhere, wasn't it?). But I remembered to pick up some shells at the store finally and came up with these three gems. All were terrific and I will endeavor to replicate them again soon.

Fiona had:
Tomato sauce + herbs + shredded mozzarella + mini (turkey) pepperoni + sliced black olives
A simple, yet elegant pizza.
 Ed had his favorite, a Hawaiian combo:
Tomato sauce + herbs + shredded mozzarella + chopped canadian ham + mini (turkey) pepperoni + carmelized white onions + roasted and deskinned red bell peppers + crushed pineapple.
He liked it but I didn't get enough pineapple on it for his taste. I 'll be sure to load it up next time. I think I'll buy chunks rather than the crushed next time too. At the table, he also generously added anchovies. :/ I had balked at putting them on, but he really wanted them. To each his own! But overall, a success nonetheless.
 And I'm saving the best for last! Here's my delectable veggie pizza on a nice thin and crispy crust:
Tomato sauce + herbs + shredded mozzarella + sliced fresh mozzarella + carmelized white onions + roasted and deskinned red bell peppers + sauteed portabello mushrooms + pickled artichoke heart wedges. Oh my. It was soo good. Nothing like delivery at all.
And the leftovers were even better the next day, too!
I haven't posted about any food items in a long time so I think its definitely time to get those taste buds tingling. No sweets today, but some lovely home-made pizzas. Those of you who know me in real life, may remember that many long years ago I put myself through school working in a variety of pizza joints. So I appreciate a good pizza and really looove a great one. We've had a few delivery pizzas lately and they've been OK (except when I accidentally ordered some bizarro combination one time when I was just a little bit tiddly. OK, maybe more than a just little bit, but that's why I was staying home and not driving anywhere, wasn't it?). But I remembered to pick up some shells at the store finally and came up with these three gems. All were terrific and I will endeavor to replicate them again soon.

Fiona had:
Tomato sauce + herbs + shredded mozzarella + mini (turkey) pepperoni + sliced black olives
A simple, yet elegant pizza.

Tomato sauce + herbs + shredded mozzarella + chopped canadian ham + mini (turkey) pepperoni + carmelized white onions + roasted and deskinned red bell peppers + crushed pineapple.
He liked it but I didn't get enough pineapple on it for his taste. I 'll be sure to load it up next time. I think I'll buy chunks rather than the crushed next time too. At the table, he also generously added anchovies. :/ I had balked at putting them on, but he really wanted them. To each his own! But overall, a success nonetheless.

Tomato sauce + herbs + shredded mozzarella + sliced fresh mozzarella + carmelized white onions + roasted and deskinned red bell peppers + sauteed portabello mushrooms + pickled artichoke heart wedges. Oh my. It was soo good. Nothing like delivery at all.
And the leftovers were even better the next day, too!
Subscribe to:
Posts (Atom)