Showing posts with label cigar box craft. Show all posts

Wednesday, October 24, 2012

And yet more cigar boxes

I love me a good cigar box, you all know that. If it does something cool in addition to being a cigar box, well, that's a big bonus!

Recently, I succumbed to the washi tape craze. I have held myself in check because I can plainly see that these addictive lovely little tape rolls could easily take over. So...washi tape, cigar boxes and a little cruising on the interwebs for inspiration and a new project is born!


Here is the cast of characters: 4 new (used) cigar boxes fresh from my local cigar shop. This time I chose "naked" boxes with no decorative paper covering.


My good friend Chris from Fox Trail Knives was kind enough to cut these little "G" shapes out of some leftover wood I had from another project. We had a nice time brainstorming what their exact size and shape should be for what I wanted them to do. And since he has practically every woodworking tool known to mankind (well not really, but way more than what I have) it was no problem for him to cut these shapes pretty quickly.


Next, he cut and sanded down my dowel rods so that they fit inside each box. The interesting thing about cigar boxes is that they all are unique in size and dimensions. Even those that are for the same type of cigar have some fluctuations. I love that--machine made/computerized precision is death to the organic beauty and individuality of crafts, especially wooden ones.


I had also purchased some hacksaw blades and now I trimmed these to fit within each box.
The serrated blade will act as the cutting edge for some of the washi tape.
A little manipulation quickly demonstrated that if I just glued the blade down to the inside lip of the box (outside mounting would look too crude, I felt) the blade would interfere with the lid closing properly. So I needed a way to tilt the blade inward just a bit. I decided to glue down a piece of string as guard to fulfill that purpose. I used my favorite wood glue which dries yellow. sigh. yeah, next time I'll use the Elmer's so the yellow doesn't show on the white string. But the blade will cover most of it anyway.
After the string's glue was dry, I mounted my blade with E6000, some of my favorite adhesive. Its smelly, but it sure gets the job done. Then I used the wood glue to adhere the G-brackets and...
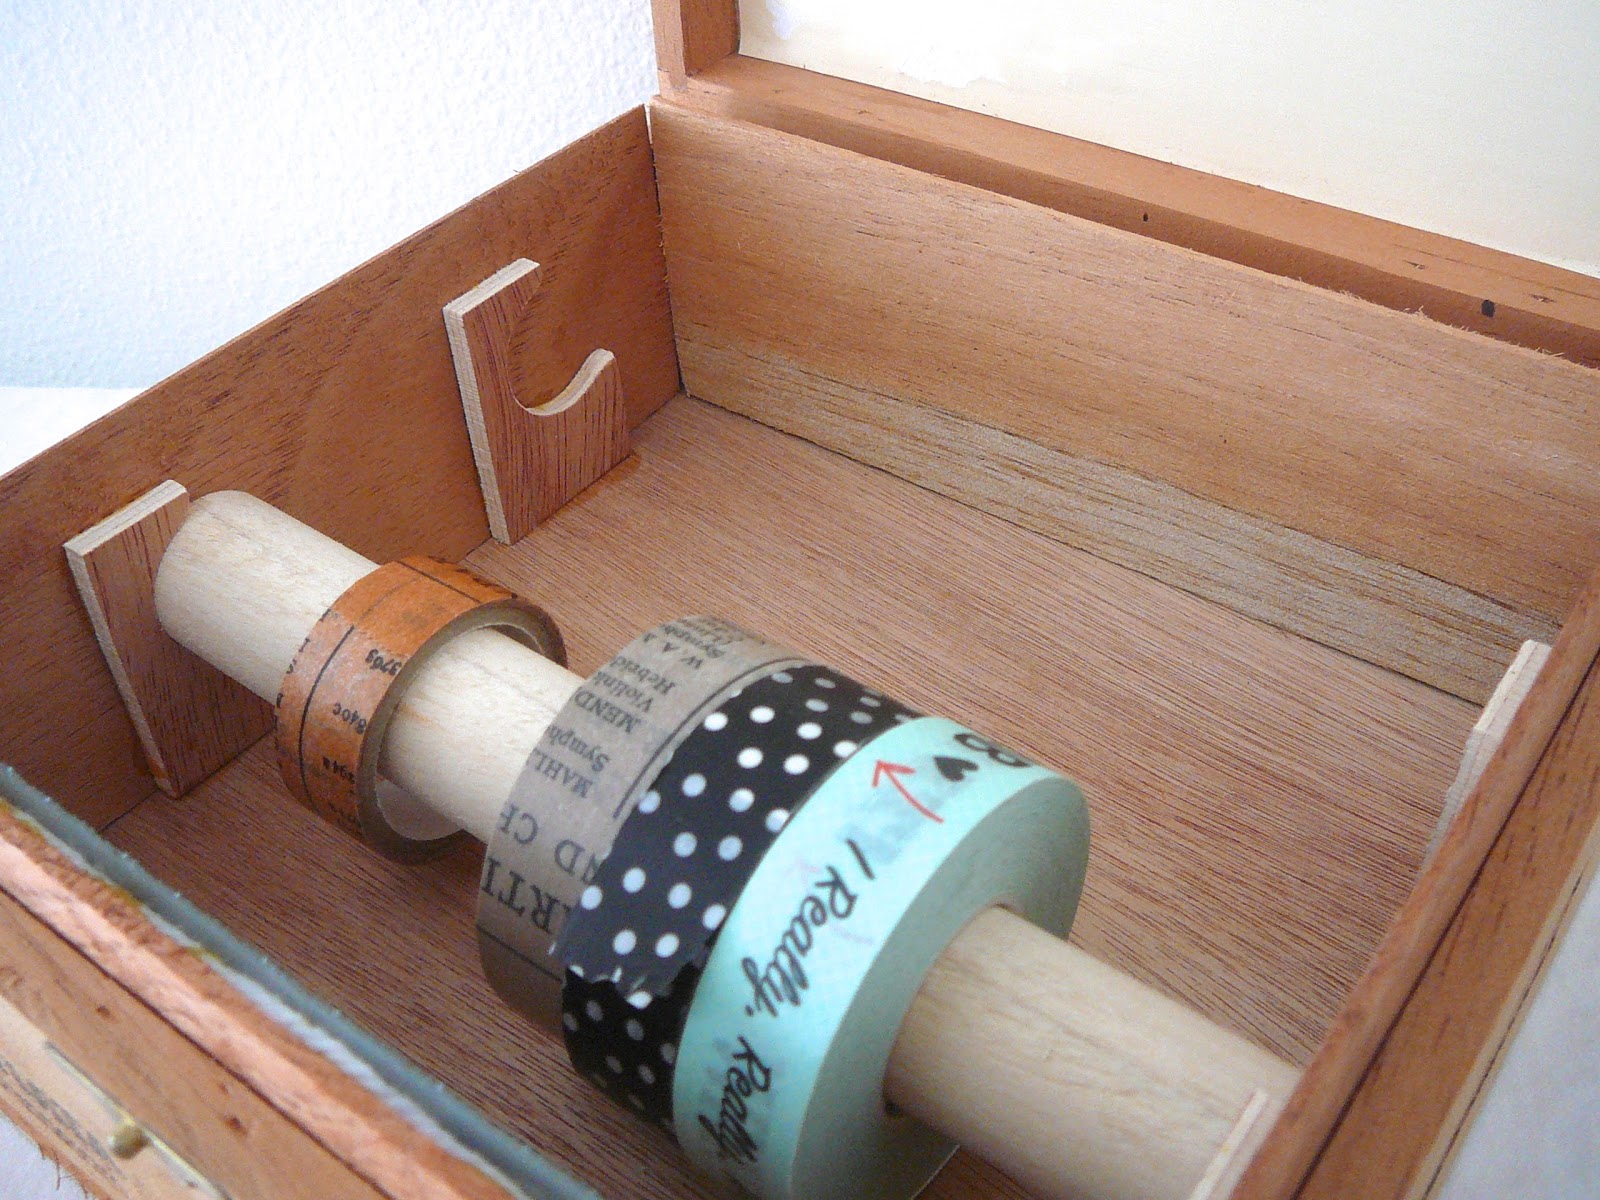
 Voila! Washi tape storage!
 The dowel rods easily lift out so that I can switch my tapes out, but because the bracket has a raised lip at the back end, the dowel rods easily stay in position.
I've removed the back rod here and you can see the where the rod rests on the bracket.


Thanks again, Chris! I would have had to undergo major contortions to accomplish these wooden cut-outs or something that approximates them.

Wednesday, February 08, 2012

Pendents and cabinets

I'v been a busy little bee in all sorts of arenas lately so here are some more finished projects! I'm always so happy when I can talk about finished pieces because I have so many (ahem) unfinished ones floating around. I have to work very hard at not feeling guilty about that (a wasted stupid emotion) and instead let each piece progress and grow at its own pace. Or something. I just wish some pieces (and you know who you are!) wouldn't take years to incubate. [see how I did that? its not my fault I have a bejillion projects underway]

Here's the latest in my cigar box cabinets. Note the beautiful woods used on the boxes. Gosh, they sure are pretty. No cigar box labels for these lovelies! The logos are simply burned or imprinted into the wood and stained. Notice the dove tailing on the edges? So nice.

This time I used very small and demure knobs to help me grasp each box and pull it out from its shelf. You hardly even notice them, huh?


And here's a picture of all of the cabinets I've made so far nestled all up together all snug and friendly in my studio. They look happy I think.


Should I make some more? I do have a few more boxes. Well, we'll see.


But as I mentioned in the last post, this past week has been all about domino pendents. Yesterday I finished 8 more. Fiona, my daughter, ran off with one of them, so here are the remaining 7.

This batch turned out better than the first two as far as the surface sealer was concerned. I don't know what I did differently but the sealer dried crystal clear and was perfect. I used a mixture of different images: another Frida Kahlo portrait, 3 Tarot cards from the Major Arcana, 2 screen shots from Pocket Frogs (my current fav iPhone game) and even a close up from one of my quilts.

And now I truly do have the whole process ironed out and the whole thing is a breeze to complete.

Monday, January 16, 2012

Cigar Box Cabinets--Done!

Big sigh--don't you think every weekend should be 3 days? I sure do! Two days for chores and necessaries and one day for glorious crafting and nothing but crafting.

Here's what I got done: 2 cigar box cabinets (OK, I started the first one a couple of weeks ago, but still). And I packed them full of craft supplies instantly. Clearly I need to make more--so I have 2 more planned/in the works.

Thanks to ebay, I bought 2 lots of vintage cigar box labels and used those to decorate the sides of the cabinets (I just thought they looked a little plain). I used Mod Podge (remember decoupaged purses from the 70's??) and, man, that stuff is awesome!

Somehow, I missed out on the whole decoupage craze back then (not sure how, I tried everything else!). I tried both the matte and gloss and definitely liked the gloss the best. It made a nice finish on the surface of the wood I was using and, duh, adhered the labels down and then sealed them beautifully. I just had to be careful for air bubbles forming in the center of the larger ones. But I managed.

The nice thing about the labels is that they are embossed so there's a great textural element too, when you look closely.

I'm also exploring another Mod Podge product: Dimensional Mod Podge. The jury is still out--I'll post when the projects are complete. I have some high hopes. If it works like I hope it does, more fridge magnets and a bunch of new pendents are in my immediate future. Or, shall I say, my etsy store's future. :)


Saturday, January 07, 2012

Still digging them cigar boxes

Greetings, dear readers--its been a busy week but I did just manage to finish my cigar box cabinet.

Here it is in all of its glory! I spent some fun time on ebay looking for fixtures, knobs, additional decals and edging tape.  I also spent the entire week sampling several different finishes on some leftover scrap wood. In multiple permutations with each other. Lots of fun crafting and interesting decisions to make!

When it was all said and done, I decided against any paint, stain, crackle or additional decals. I ended up liking the grain and color of the luan wood that I bought at the Despot so much that I just sanded and finished with gloss Mod Podge.

I was going to sell this baby at my etsy store, but I got very attached to the thing and am already planning what I need to store in it. 

 Here are a couple detail shots:


The lovely knobs! I would have preferred label pull tabs but they were not to be found in the appropriate size, finish and cost. Whatever--these are pretty damn good.


And here you can see the finish. This wood is extremely absorbent and really needed a sealer. No stain here--that's the natural color of the wood veneer of this stuff.  Supposedly the veneer is made out of a "low-grade mahogany". Its grain and color is very compatible with the exposed wood of the cigar boxes, an unexpected plus.

I'm going to let everything dry really well overnight. Tomorrow I'm going to find a good spot in my studio for it and then load it up with crafting supplies!


And after that's done, there's all of these new ones to deal with! :)

Wednesday, January 04, 2012

Cigar box love

Hi all, its the new year and I hope all of you entered the auspicious 2012 with a creative focus and a positive outlook. I know I have! I look forward to Jan. 1 each year--I know it sounds corny but I like making resolutions--I think about it all December and always view it as an opportunity for a fresh and exciting new start. This year I resolved to be more consistently creative and organized. This includes keeping my studio neater and actually entering shows (instead of just downloading the entry application and losing it in my kitchen counter maelstrom). AND, I am proud to say that my studio has already had a good deep cleaning and reorganization and I have entered not 1, but 2 shows already. And its only Jan. 4!  Wahoo!

I've been chugging away on several projects in the last couple of weeks--so I'll be posting the finished doggie sweater and Blade Garden quilt soon as well as updates on some other quilts and other fun stuff. Its a time of new beginnings, right? So permission was granted to start some new projects--yay!

And I have to confess, I'm in loooove. Big time obsession, even. My new(old) amor is/are cigar boxes: all sizes, in their wooden glory with beautiful embossed decals and edgeing. Glorious deep reds and stamps and Victorian era art work. Swoon.
I've always had an unrequited simmering lust for the things and a couple of websites I stumbled across lately just reignited that fire. And then, the very next day after my web-surfing, I happened to walk past my...wait for it...local cigar shop that just happened to have piles and piles of empty cigar boxes for sale (reasonable, too). They called to me, I tell you. I just HAD to have some. Well, could you ignore such a sign, I ask you?  No, neither could I. Here are some (!) of the lovelies I came home with.

So then I got to thinking: "hmmm, boxes are great for storage. and craft rooms and studios always need more storage. and boxes stacked on top of each other are pretty but not really functional--they need to be on their own little shelves. maybe I can build a little shelf unit to size. I think 6 boxes would be a good number. how would I construct it." and on and on in that vein. I love that kind of brainstorming.


Thus it was that I set off to the Depot, for some luan wood and some wood glue and then off to a good friend with a table saw who could cut it to size for me (Many many thanks, Chris!!). Here are the pieces cut for the sides and back of the little cabinet and the small wood pieces that will support the shelves.

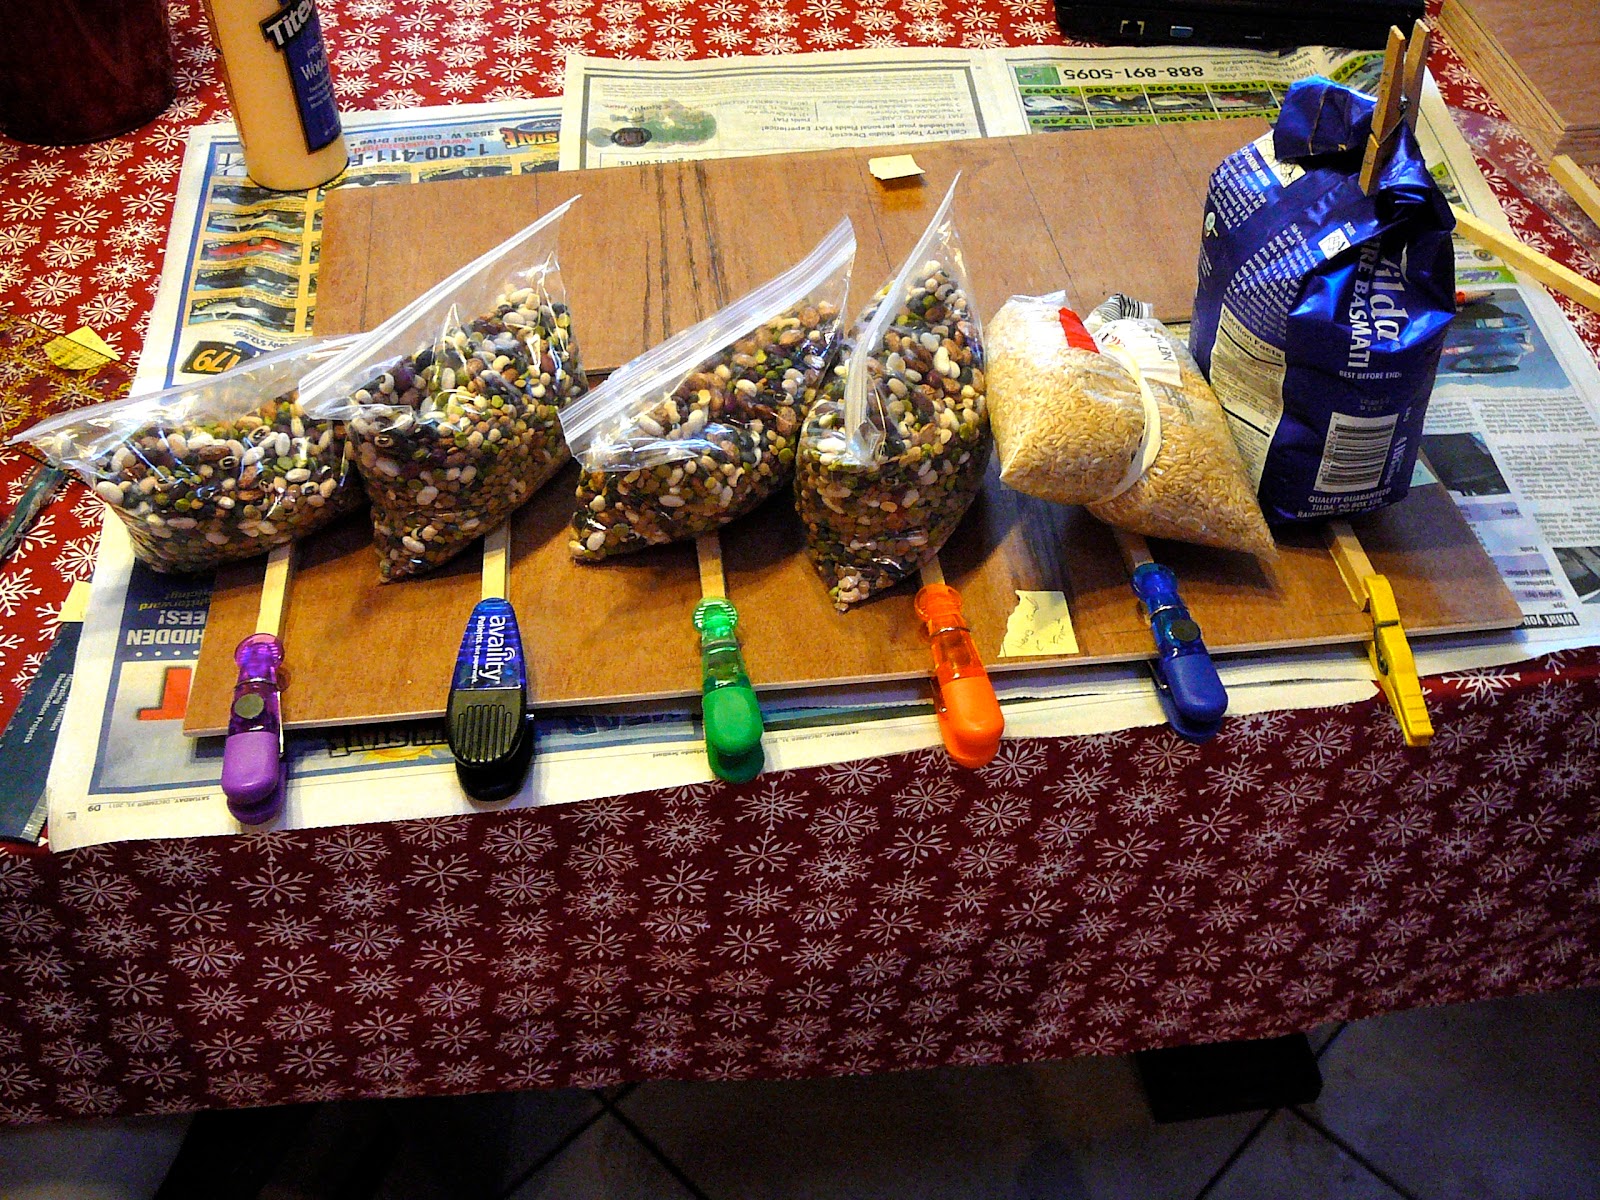
Next, its time to carefully glue down the shelf supports. I didn't have any clamps so chip clips and beans and rice serve as weights to hold the supports down until the glue sets up. Don't laugh, it worked! After the glue had set up, I followed up with some little nails (I had some little bitty ones that were just the right size).

My lack of clamps or straps was really an issue when it came time time to assemble the back and sides together. This time, rubber bands came in to play to support the beans and rice. There was a little bit of cursing involved and a couple of tense moments when I wished I had three hands, and there are a few imperfections despite all of my best efforts, BUT, over all it came together nicely.

And here it is all glued and nailed and the boxes inserted--so cool!

My next dilemma: paint? or no? if yes, what color(s)? maybe, maybe a finish--a crackle finish? sanded along the edges?decoupage on sides? of? can I get some cigar box decals? or edging?

Clearly, time to experiment with some scrap pieces!

Well, however that all works itself out, it became clear that some sort of knob or pull needed to be installed on the front of each box to aid in pulling each one out. And they need to be brass and vintage, and match the whole vibe of a cigar box, right?

So for knob/pulls/decals--Look out, Ebay, here I come!